Showing posts with label BBQ. Show all posts

Sunday, 2 November 2014

Best Brownies


I'm playing with 'The very hungry caterpillar' story in a kindergarten with children, we're learning about food, I give them different food to taste (connected with a story) and here we are in front of a chocolate cake, one of the things a catepillar ate in that story. So I decided to bake them one. I chose that brownie, hesitating a little - I wasn't sure if it will be good for them - it is 70% chocolate, hmmm, they might not like it... 
I was amazed at the lesson, when they were saying 'chocolate cake please' with their mouth full of previous piece :D so - brownie tested - children will definitely love it ;)
P.S. Oh, it simply must be delicious ;) It's Martha's favourite :) I changed the original recipe a little bit :)


Ingredients:
  • 1 cup (2 sticks) of margarine, cut into small pieces + more to grease the baking pan
  • 2/3 cup  flour + some more to sprinkle the baking pan (alternatively, it is also good to use cocoa powder)
  • 1/2 teaspoon of salt
  • 12 ounces of 70% chocolate, chopped
  • 1 1/4 cups of packed light-brown sugar
  • 4 large eggs
  • 1 tablespoon of vanilla extract


Preparation:
  1. Grease a smaller baking pan. Dust with flour/cocoa. Tap out excess and set aside. 
  2. Sieve flour and salt in a small bowl, set aside as well.
  3. Take a non-stick pot, put chocolate and margarine inside and boil on a very low heat, so that it won't  burn. Instead, you can make a 'bath'. Stir from time to time. When done, pour to a different pot/bowl and set aside (or keep stiring), to let it cool completely.
  4. Start preheating the oven to 190C. 
  5. When the chocolate is completely cool, take a mixer's bowl, put sugar and eggs inside and beat on a high speed till bright (3-5 minutes). Reduce speed to low and add chocolate mixture and the vanilla. Add flour. Mix only till it is well combined.
  6. Distribute the mixture all over the pan, prepared at the very beginning. 
  7. Bake for 20-30 minutes (until top of the brownie has cracked and its center is soft or until the toothpick comes out with moist crumbs). 
  8. Let it cool completely. 
  9. Cut into squares.
  10. Store in an airtight container up to 2 days.
  11. Bon Appetit! :)

Thursday, 28 August 2014

Tropical Apple Pie

The second I saw this recipe I knew - this is going to be the best apple pie in the Universe. So I made it, twice bigger than the original recipe says ;) And I was perfectly right :) I had quite a lot of it, all the guests were smitten with it, I gave some 'takeaway' portions and I was receiving calls and txt messages with compliments and asks for the recipe for the entire afternoon ;)
So, here, again, bravo for KS for another wonderful recipe!
I changed the original recipe, I've added more margarine, thanks to this change it has absolutely different taste and is way better, believe me!


Ingredients:

Dough:
  • 6 glasses of flour
  • 12 tablespoons of powdered sugar
  • 2 pinches of salt
  • 345g of butter
  • 235g of margarine
  • optionally - if the dough isn't sticky enough - add a little water

Filling:
  • 1800g of apples (cut into a little bit thicker slices)
  • 900g of pineapple (fresh or tinned, cut into small pieces) 
  • 1/2 glass of brown sugar
  • 2 teaspoons of ground cinnamon
  • 1 vanilla sugar
  • 2 packagings (40g each) of vanilla powdered budyń (or 1/2 glass of potato starch)
  • a handful of almond flakes or shredded coconut

Optionally:
  • filling: a handful of raisins (of course if You like raisins, add as much as You like, though not more than 1 glass)
  • top: 1 beaten egg to spread on the top, before baking
  • top: powdered sugar, to sprinkle the top of the cake, after baking

Preparation:

Dough:
  1. Take a big bowl, sieve flour and powdered sugar inside, add salt as well as butter and margarine cut into small pieces. Knead or mix till everything links (especially butter and margarine). If the dough isn't sticky enough and You can't form a ball, add a little water.
  2. Divide the dough into 2 pieces, cover with foil and put in the fridge for an hour.
  3. During that time, prepare a suitable baking pan (around 30x40 cm) - grease it and cover with baking paper. Also, during that time, prepare the filling.
Filling:
  1. Wash, peel, cut the apples (cut out the kernels and throw away) and put in a big pot or bowl. 
  2. Do the same with the pineapple and mix with apples.
  3. Optionally, add raisins to the same pot/bowl and mix.
  4. Add sugar, cinnamon, vanilla sugar and budyń/potato starch and mix precisely.

Baking:
  1. Start preheating the oven to 190C.
  2. Take the first part of the dough, distribute all over the bottom of the baking pan and its sides.
  3. Add mixed filling.
  4. Sprinkle with almond flakes or shredded coconut.
  5. Take the second part of the dough from the fridge and - either make a crumble or roll out the pastry thinly and cover the cake or roll out the dough thinly, cut into stripes and make a chequered pattern.
  6. Optionally - beat 1 egg and distribute all over the top.
  7. If the oven is ready, put the cake inside and bake for 70 minutes till golden brown.
  8. If the top or bottom is getting too dark and isn't ready - cover the top with a piece of foil and the bottom, for example with baking tray.
  9. Take out from the oven and serve for instance with powdered sugar on the top or with some vanilla ice cream.
  10. Bon Appetit! :)

Sunday, 17 August 2014

Raspberry Buns

Absolutely stunning! Best buns I've ever eaten! Soft, moist, sweet raspberries plus mascarpone cheese make a wonderful couple if it comes to the taste and the overall effect is outrageous :) Perfect for breakfast, lunch, either at home or at work/school. A definite must-bake :) A big thanks to Deliciouslyyum for the recipe!
If You need a converter, feel free to use this one.


Ingredients:


Dough:

  • 1 cup of milk
  • 4 tablespoons of butter, cut into small pieces
  • 3 1/4 – 3 1/2 cups of flour, divided
  • 1 package of instant yeast (about 2 1/4 teaspoons)
  • 1/4 cup of white sugar
  • 1/2 teaspoon of salt
  • 1 egg

Filling:

  • 8 oz. of mascarpone cheese, at room temperature
  • 5 tablespoons of granulated sugar, divided
  • 1 teaspoon of vanilla extract
  • 12 oz. of raspberries (if frozen, need to be defrost and dried on a paper towel)
  • 1 tablespoon of cornstarch
  • zest of 1 lemon

Icing:
  • 1 and 1/2 cups of confectioners’ sugar
  • 2 tablespoons of melted butter
  • 1/2 teaspoon of vanilla
  • 1-2 tablespoons of milk


Preparation:


Dough:

  1. Take a baking tray, grease and put baking paper all over it. Set aside.
  2. Take a bowl (suitable to put in a microwave or on the stove), put milk and butter inside and heat till the butter is almost melted and the milk is warm. Stir till the butter is completely melted. Set aside. 
  3. Take a big bowl (you can do it using a stand mixer if it is suitable to knead the dough), put 2 cups of flour, yeast, sugar, and salt inside. Stir, so that it mixes.
  4. Add the egg and milk to the dry mix and continue stirring until thoroughly combined. Start kneading for at least few minutes (till the douhg starts pulling away from the sides) and add remaining flour. 
  5. Knead the dough for another 5 minutes. 
  6. Cover the bowl with dough with a dry, clean cloth and put in a warm place (do not leave it near an open window, even if it is hot outside). Leave it for at least 10 minutes or until it doubles its size.
  7. During that time, prepare the filling.

Filling&Dough:

  1. Take a bowl, put mascarpone cheese, 3 tablespoons of sugar and vanilla extract inside. Set aside.
  2. Take another bowl, put frozen raspberries, remaining 2 tablespoons of sugar and cornstarch inside, mix. Set aside as well.
  1. When the dough is ready, sprinkle kitchen's surface with flour and roll it out until you get a 12 x 14 inches rectangle. 
  2. Distribute mascarpone cheese mixture evenly over the dough. Put raspberry mixture on top and sprinkle with lemon zest. 
  3. Now, time to roll the dough up - starting with one of the longer's side, roll the dough into a log. Close the sides very precisely so that the filling doesn't come out. 
  4. Cut into slices (around 2-3 cm thick) and put them on previously prepared baking tray, leaving some space between them (the buns will rise again). Cover again with a clean kitchen cloth. Set aside in a warm place for at least 30 minutes (or till it doubles its size again). 
  5. During that time, start preheating the oven to 180C. 
  6. Bake the buns for around 20 minutes (or until the tops are golden brown).
  7. Now, it is a good time, to prepare the icing.
Icing:
  1. Mix confectioners’ sugar, butter, vanilla and milk. 
  2. When the buns are ready, take them out from the oven, let them cool down for a while and distribute the icing all over their tops.
  3. Keep closed for max 3 days or store closed in the freezer for maximum 3 weeks.
  4. Bon Appetit! ;)

Sunday, 13 July 2014

Fruit Jellies

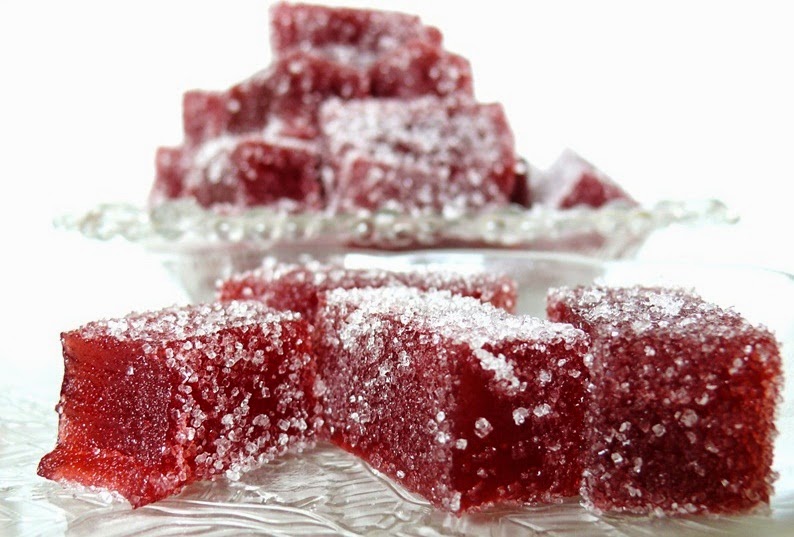
Very tasty, fruity, healthy, natural jellies, possible to be prepared from many different fruit, especially, if you have no idea, what to do with them or when they are...way too ripe ;) 
Lack of artificial substances is undoubtedly their biggest advantage.
They might be sprinkled with sugar (though I prefer sugar-free jellies :) ). It is a quick, light and delicious form of confectionery. My little naphew's face and hands are all in strawberry jelly now, so I guess they're tasty, hi hi ;)
Recipe comes from this website.


Ingredients:
  • 30 g of gelatin
  • 1 glass of water
  • 1-2 glasses of sugar (it depends how sweet you want your fruit puree to be)
  • 1 teaspoon of lemon juice
  • 500-600 g of fruit (either frozen or fresh - preferably: strawberries, raspberries, blueberries, currants, cherries)*

* I mixed blueberries with strawberries, which is why they are so dark.


Optional ingredients:
  • sugar or powdered sugar - to sprinkle the jellies

Preparation:
  1. Take a bigger, clean pot and put the fruit inside. Boil for 15 minutes. Grate through the sieve, to seperate puree and kernels. 
  2. Take only 3/4 glass of the mousse** to prepare jellies. Put the glass with mousse aside.
  3. Take another pot, put gelatin inside and pour the water. Wait for 4 minutes. Heat, till all the gelatin melts (stir). Add 1-2 glasses of sugar, boil and  stir till the sugar melts. Add lemon juice. 
  4. Boil for around 10 minutes on a very low heat. Turn off the heat and leave the mixture for 5 minutes. Take away the foam if any appears.
  5. Mix with fruit mousse.
  6. Take a flat form, cover with cling film or foil. Pour the mixture inside. Put it in the fridge for around 12 hours, or till the jelly stiffens.
  7. After that time, take it out of the form and cut it in any shape you like - you can use only a knife to make small squares or cookie cutters to make shapes.
  8. Sprinkle with sugar/powdered sugar - preferably only those you want to eat now.
  9. Jellies can remain (in a closed box) in the fridge for max. 2 weeks. 
  10. Bon appetit! :)

Wednesday, 2 July 2014

Strawberry Yoghurt Cake

I was looking for a nice strawberry cake recipe. But not the strawberry cake I’ve already made, ahh, I craved for something new, as I’m addicted to trying new recipes. And I found this strawberry yoghurt cake. One word: Wow! That’s the quickest and the one of the cheapest cake I’ve ever made! And I needed to bake 2 pans, one after another, day after day, cause it disappeared so quickly! I’m utterly shocked! And how many variations this one particular cake has, that’s unbelievable! Delicate, spongy, sweet, perfect for a morning coffee and for a nice lunch at work ;-) What’s more, that’s one of the ‘light’ cakes, so we can feel excused for eating half of the baking pan ;) (giggle) 
I do recommend!
The only thing that I found particularly difficult to explain to You is a polish dessert - powdered, quick, jelly-like, fruit-flavoured 'kisiel'. I can't find an equivalent for it in English. I do encourage You to look up for it. Wikipedia defines it as 'kissel' and explains a little bit what it is. If You are unable to buy it, You can easily use jam ;)
I made quite a lot of changes, though still - big thanks for KwestiaSmaku for the recipe!

Ingredients:

1 glass = 250ml
  • 2 big eggs
  • 1 glass of greek yoghurt
  • 2 glasses of flour
  • 2 teaspoons of baking powder
  • 500g of strawberries
  • ¾ -1 glass of sugar
  • 2 tablespoons of vanilla sugar
  • 25g of melted butter (or 25g of oil)
  • 1 powdered strawberry kissel
  • 2-3 tablespoons of strawberry jam


Optional ingredients:
  • Powdered sugar
  • X g of any other berries ;) (I had one bowl of currants from my garden, so I used them J)
  • Icing sugar


Preparation:
  1. Bring eggs and yoghurt to room temperature.
  2. Prepare 3 bowls. Mix flour with baking powder very precisely and sieve to the 1st bowl. Put aside.
  3. Wash your fruit. Take 500g of strawberries, cut out the leaves, divide into halves (250g each), put in remaining 2 bowls. Cut the strawberries into halves (if the strawberry is really big – 3 pieces)
  4. Take a mixer’s bowl. Put sugar and vanilla sugar inside.
  5. Melt the butter in a small pot.
  6. Take a rectangular baking pan (preferably 20x30 cm, might be a little bit bigger), grease it precisely with soft butter. Put aside.
  7. Start preheating the oven to 165C.
  8. Prepare the kissel as the recipe on the packaging says. Mix with jam. Mix 1/3 of this kissel-jam mixture with one strawberry bowl. Put aside.
  9. Add eggs to the mixer’s bowl with sugars.
  10. Using a mixer, start beating for 7 minutes. After that time, put the mixer aside, add yoghurt, melted butter, sieved flour with baking powder and slowly, precisely, for a short time, stir, using a big spoon or spatula, only till all the ingredients link, not longer.
  11. Put the dough in previously prepared greased baking pan, distribute the dough all over the pan.
  12. Take a bowl with kissel strawberries. Here – preferably – don’t use much of the kissel as it may destroy the cake, it is perfectly enough if there is some kissel on the strawberry. Put the strawberries all over the cake, leaving some space between them (chequered pattern works and looks perfectly).
  13. When done, put it in the oven and bake for 20 minutes. Observe your cake, it might take less or more time for Your cake to be ready, as every oven works differently – You are probably the person who knows it best.
  14. After those 20 minutes, if the top is gold, use a toothpick to check, if it is ready inside. If not – cover the top with foil and bake for another 10 minutes or so.*
  15. Cool down, take out from the pan. Take the second bowl with strawberries and kissel, fill the holes in the cake - firstly with some kissel, then with a strawberry.
  16. Sprinkle the cake with (for instance) remaining fruit (or any other additional fruit if You have prepared them), powdered sugar, icing sugar or add remaining kissel all over the cake.
  17. Bon Appetit! ;)


*the cake should be much bigger, its sides should stick out from the pan, the top should be gold and a toothpick clean (if there is any cake glued to a toothpick, it is not ready yet)


Friday, 27 June 2014

Basil paste

I came across this recipe while looking for an alternative breakfast recipes. This paste sounded really perfect to me - something new, quick and easy to make. And - believe me, it tastes really, really good - some of you may know flavoured butters (smaksełko? ;) ) - they were extremely popular some time ago and very tasty, though I can't find it in any shop, can you? This is not a butter, as it is made of cottage cheese. Though I'm sure it would be same delicious as a butter! It is perfect for example with: fresh, hot bread/rolls, with cold meats, tomatoes, for brushetta, ciabatta bread... :)
Recipe, slightly changed, comes from this website.


Ingredients:
  • 250g of cottage cheese (low-, semi- or full-fat)
  • a bunch of fresh basil
  • 1/2-1 clove of garlic
  • 8 tablespoons of oil 
  • 1 teaspoon of black ground pepper
  • a pinch of salt
  • 1 teaspoon of sichuan pepper

Preparation:
  1. Put the cheese in a bowl, add spices (black pepper, salt, sichuan pepper). 
  2. Take a blender and its bowl (or any bowl suitable for blending), put basil, garlic and oil inside, blend till smooth (or almost smooth). 
  3. Mix basil paste with cottage cheese, blend till smooth.
  4. Store closed in the fridge.
  5. Bon Appetit! :)

Sunday, 15 June 2014

Puff pastry cookies with strawberries and Nutella

Are unexpected guests coming soon? Don't you have a clue what to put on the table? Are you organizing a party where sophisticated cakes aren't a suitable match? This is an easy, quick, and overtasty solution :) I do strongly recommend :) They're outrageous!
The recipe comes from this website, as usually, I changed a tiny little bit :)

Ingredients:
  • 1 packing of good quality ready made puff pastry
  • 1/2 jar of Nutella (or something very similar in taste to Nutella)
  • 100 g of strawberries
  • powdered sugar
Optional ingredients:
  • chopped pistachios (to sprinkle the top)

Preparation:

  1. If your puff pastry is totally frozen - defrost it. It needs to be in a room temperature (so that it won't shrink during baking).
  2. Take your puff pastry and using a shape cutter (in every shape you want, it doesn't need to be a heart shape) make as many shapes as you can from your puff pastry. Roll the leftovers of the puffpastry and use it as well. If the puff pastry is too sticky - use some flour (sprinkle it on the puff pastry and rolling pin)
  3. Put the cutouts on a baking sheet (remember to put the baking paper on your baking sheet)
  4. Put in the middle of every cutout 1 teaspoon of Nutella
  5. Take the strawberries and - optionally - cut them into halves.
  6. Put the strawberries on Nutella.
  7. Bake in 200 C for 15-17 minutes (may be ready faster - keep an eye on them - if the colour is gold - it is ready). Cool down.
  8. Add some powdered sugar on the top.
  9. Bon Appetit ! :)

Saturday, 28 September 2013

Italian Torta Margherita

Very easy and tasty cake. Last minute idea, when you have a craving for a cake ;)The only thing I needed to buy to prepare it was a greek yoghurt ;) So the cost of preparing it is automatically low too :) Recipe comes from all over the Internet, containing some Italian websites (for example: ricette.giallozafferano.it , emikodavies.com) :)


Ingredients:

  • 300 g of greek yoghurt
  • 300 g of sugar
  • 3 eggs
  • 150 g of oil
  • 600 g of flour
  • 2 teaspoons of baking powder
  • 16 g of vanilla sugar
  • 200-500 g of fruit - plums, apples, nectarine, pear (preffered harder ones, not very juicy)
  • some butter
  • powdered sugar or icing sugar


Optional ingredients:
  • 2-3 teaspoons zest of a lemon (optional)
  • 1 teaspoon of vanilla extract

Preparation:
  1. Wash, peel and chop the fruit into wedges.
  2. Start heating the oven to 200C.
  3. Take a big bowl.
  4. Put yoghurt and sugar inside, add eggs and stir. Add oil and stir again.
  5. Add flour, baking powder and optional ingredients (if desired). Stir everything.
  6. Add fruit and stir again.
  7. Take a springform cake tin (though I used fluted cake ring) grease it thoroughly.
  8. Put the dough in a tin and bake for 30-40 minutes in 200C.*
  9. Check, by using a toothpick if the cake is ready (put the toothpick as deep as possible, to get sure).
  10. Take it out from the oven, cool down, then overturn the cake and by tapping, take it out from the form.
  11. Sprinkle with powdered sugar or icing sugar.
  12. Bon Appetit! :)
* The top of the cake may start getting burnt very fast because the oven is already preheated. To prevent your cake, when you notice it starts burning, put a piece of foil on the entire top of the cake. 

Wednesday, 21 August 2013

Home-made bread with thick, crunchy skin

A very tasty bread and a very good recipe. I guess it is impossible to fail... :) The only disadvantage is time, which is why it is good to prepare the dough in the evening and bake it the next day, in the afternoon/evening.
Recipe comes from this website.


Ingredients:
  • 300 g of flour
  • 100 g of wholemeal flour
  • 1,5 teaspoon of salt
  • 20 g of fresh yeast (or 1 teaspoon of instant yeast)
  • 300 g of cold water

Optional ingredients:
  • wholemeal flour or bran or poppy to sprinkle the top of the bread
  • a handful of pumpkin or other seeds to 'upgrade' the bread :) 

Preparation:
  1. Put the flour in a big bowl. Add salt, crumbled yeast and stir using a spoon. Add water and stir again(quickly, shortly, so that all the ingredients link).
  2. Cover the bowl with foil and put aside for 12-14 hours in a room temperature (it grows).
  3. Sprinkle the kitchen surface with flour, put the dough on it. Fold it 3-4 times, using your hands.
  4. Take a clean cloth, sprinkle it with flour, put the dough on it. Cover the dough using the same cloth and put aside in a warm place for another 1-2 hours (it grows again).
  5. After 1,5 from these 2 hours in point 4, put the oven's lattice on the lower part of the oven (1/3), take a clean casserole (with its lid) and put it in the oven. Start preheating the oven to 240-250C.
  6. When these 2 hours end, take out the casserole from the oven (be careful it will be very very hot!) and put the dough inside it (sprinkle your hands with flour, it is easier to move the dough then).
  7. Cover the casserole with its lid and bake for 30 minutes. 
  8. After 30 minutes, take of the lid and bake for another 15-30 minutes. Advisably, after 5-10 minutes, cover the top of the bread with foil.
  9. Take out from the oven, cool down.
  10. Bon Appetit! :)

Saturday, 20 July 2013

Hungarian Sausages

The air smells of holidays, at last the barbecue season is officially open, because the weather is so pleasant and warm during late afternoons and evening. But after many BBQs there are always some leftovers and there is a doubt - what to do with them? Well, if you don't enjoy reheating them, this is a mouth-watering solution.
Obviously, this is not only an idea for BBQ's leftovers. ;)
Recipe comes from my friend's mum. Enormous thanks for her for the recipe!

Ingredients:

  • 2-3 tablespoons of oil
  • 1/2-1 chopped onion
  • 2 cloves of garlic cut info slices
  • sausages cut into slices
  • tomato puree
  • (sweet&)spicy sauce
  • ketchup
  • 1 pepper - cut into stripes or small parts
Optional ingredients:
  • courgette - cut into slices
  • sweetcorn
  • red (kidney) beans
  • tomato wedges

Preparation:

  1. Put the oil on the frying pan. Put garlic, onion and sausages, fry (on an average heat) till their colour get light gold. Turn the heat off.
  2. Take a tumbler. Put 5 tablespoons of tomato puree inside. Add 2 tablespoons of water. Stir. Pour it on the frying pan. 
  3. Starting from 3 tablespoons of each - add the sauce and ketchup. Stir. Turn on the heat, on the lowest power.
  4. Add optional ingredients and the pepper. Stir.
  5. Taste it and decide which flavour of the 3 ingredients (tomato puree, ketchup, sauce) you want to predominate. Of course it might be one of them, two or all of them. Add one tablespoon after another, trying it by taking a clean spoon every time you try it. While adding more tomato puree - it is essential to stir it with some water first.
  6. This meal might be eaten on its own or, for instance, with bread.
  7. Bon Appetit!

Something wet... (Golden) Mojito

This is what Mojito literally means - 'something wet'. It seems to be a perfect drink - chilling and refreshing, it might be prepared as a traditional drink as well as a soft drink. I do recommend both versions.
Slightly changed, recipe comes from BBC Food.
This one, if prepared with an alcohol, is called 'Golden Mojito' as it is prepared with golden rum. Basic Mojito is prepared with white rum, though Mojito, on its own, has plenty of flavour variations.


Ingredients for one glass:

  • 3-4 fresh mint sprigs* 
  • 3 lime wedges (3/4 of a lime)
  • 2½ teaspoon of sugar
  • ice cubes
  • soda water(=fizzy drink, tonic, sparkling water)
For decoration:
  • fresh mint sprig, thin lime wedge, etc.


Optional ingredients:
  • 25 ml of golden rum

*yes, sprigs, not only leaves. I've read that these enhance the drink's flavour as they contain some vital oils. But if you wish you can only use leaves from those sprigs.


Preparation:
  1. Clean the mint springs. Dry them on paper towels.
  2. Cut the lime into 4 wedges. 
  3. Take a highball glass. Put 1 lime wedge, add 2 mint sprigs and sugar. 
  4. Using for example a clean rolling pin (or a teaspoon), slightly muddle them (be careful not to break the glass) to release the flavour of the mint and lime. 
  5. Put another lime wedge, another 2 mint sprigs and muddle again. Add the last lime wedge and muddle it as well.
  6. Add ice cubes - almost as many as a glass can take.
  7. Slowly pour the rum and soda. Using for example a clean latte spoon, stir.
  8. Decorate the edges of the glass with mint or lime wedge, add a straw.
  9. Bon Appetit! :)

Monday, 15 July 2013

Italian Almond Cookies

 These cookies were an absolute, astonishing surprise to me. Right after taking them out of the oven, my first thought was 'my God, what a disaster, it's burnt and hard'. And that is what I told my friends. Even so, I didn't throw them away. My mum and my friends tasted it and with a delight claimed that the cookies were really delicious. How come...? 
Well, it appeared that these cookies need some time to get soft and tasty (a couple of hours, every next day they get better ;) ). 
Must try. Quick, easy, delicious.
Recipe comes from this website.

Ingredients (for 50-70 cookies):


  • 3 egg whites
  • 300g of grounded almonds (= almond flour)
  • 300g of powdered sugar (+some, to sprinkle the cookies)
  • 1 tablespoon of honey or golden syrup (I used it instead of honey)
  • filling: caramel sauce*, lemon curd, whipped cream, creme patissiere, Nutella, honey, etc.

* I used it, matches perfectly

Preparation:
  1. Mix all the ingredients using a food processor, till you get thick, malleable dough. It may be sticky. Cover it using a foil and put in the fridge for at least 30 minutes. 
  2. During that time, prepare your baking sheet - put some baking paper on it and - optionally - put a foil under the baking paper.*
  3. Take the dough out of the fridge. 
  4. Start forming small balls (around walnut's size), sprinkle it precisely with powdered sugar, put on a baking sheet and using something small with a round, smooth ending - make a hollow in every cookie (so that after baking, you can put the filling in there).
  5. Leave some space between the cookies on the baking sheet - they double their size during baking. 
  6. Bake in 160C for around 15 minutes.** 
  7. Cool them down and then add the filling.
  8. Bon Appetit ! :)

* Foil is important, if your oven likes to burn the bottom of the food. 

** Again, it depends on the oven. It is crucial to keep looking at cookies for these 15 minutes - don't let them get too gold (even though it is a little bit hard, because they remain white because of the powdered sugar). You can easily open the oven during baking (nothing bad will happen) and check(using a toothpick) or even taste one cookie to check if it is ready or not. It is advisable to lift one cookie, using for instance a fork, to check whether the bottom is burnt or not.
If you are afraid that it is baking too fast - decrease the temperature.


Sunday, 7 July 2013

Amaretti cookies

Almond cookies, a perfect cookie for a fan of amaretto/almond flavour.
Recipe comes from this website.


Ingredients:
  • 340 g grounded almonds
  • 300 g powdered sugar
  • 4 egg whites
  • 30 ml amaretto liqueur (or almond aroma)
Preparation:
  1. Beat the whites till thick (around 7 minutes).
  2. Gently add grounded almonds and sugar - stir.
  3. Add liqueur, stir.
  4. Take a baking sheet, put the baking paper on it.
  5. Using a teaspoon, put small portions (1 teaspoon= 1 cookie*) on the baking paper, leaving quite much space between cookies (they grow)
  6. Bake for 15 minutes in 170 C till they get gold.
  7. Bon Appetit :)
* Of course if you want to, make them bigger, but as you see, they get much bigger when made from 1 teaspoon.

Wednesday, 3 July 2013

Summertime cheesecake

A very tasty mix of 2 recipes + my own creativity :) 
Fresh, light, non-baking cake, perfect for a summertime coffee in a green, blossoming garden.
One recipe comes from this website and just the 'appearance' idea from this one.

Ingredients:
  • 4 packagings of ladyfingers
  • 2 tins (400 g each) of coconut milk
  • 1 kg of creamy quark (the one for cheesecakes)
  • 1/2 - 3/4 glass of sugar
  • 6 teaspoons of gelatin
  • strawberry jelly
  • strawberries, blueberries for decoration


Optional ingredients:
  • 80 ml of Malibu liqueur
  • whipped cream


Preparation:
  1. Take a spring pan. Grease it, put baking paper on the bottom. Put some ladyfingers on the bottom (only one tier).
  2. Open the tins with the coconut milk. Fill the entire glass with part of it and the rest of the coconut milk pour to the bigger bowl, add quark, sugar and liqueur. Stir.
  3. Take the glass with coconut milk and pour it to the pan. Add gelatin and heat on low heat, stiring all the time till the gelatin melts. Do not boil.
  4. Take a big bowl, put the coconut milk with gelatin inside and partially add the mix from the other bowl with quark, stiring all the time so that everything links. Pour it to your springpan with ladyfingers on the bottom.*
  5. Put it in the fridge for 10-20 minutes. Keep checking what's going on. If ladyfingers are on the top, using a spoon, plundge them in. The quark-substance gets thicker.
  6. Leave the cake in the fridge. Prepare the jelly as the packaging says. 
  7. Stir, cool it down, so that you get cold liquid.
  8. Pour the jelly on your cake. Leave, so that it solidifies. (Keep checking by shaking gently the spring pan)
  9. Put the fruit on the top. You can add whipped cream on the top as well.
  10. Keep in the fridge, so that it completely solidifies (5 hours - entire night)
  11. After that time, open the sides. If the cake is sticky - then just stick the ladyfingers. If not - apply some whipped cream on the sides and then stick the ladyfingers.**
  12. Bon Appetit :)

* Don't worry if ladyfingers don't stay on the bottom after adding quark-substance.

Tuesday, 2 July 2013

Basic Muffins

This is a recipe for the most basic muffins. You can add your own ingredients, your own flavours to this particular recipe.
It comes from this website.


Ingredients: (for 12 big muffins or 24 smaller)

  • 130 g of butter 
  • 1/2 glass of sugar 
  • 2 eggs 
  • 3/4 glass of flour 
  • 1,5 teaspoon of baking powder 
  • 2-3 tablespoons of milk (if the dough is too thick) 
Preparation:
  1. All the ingredients ought to be in room temperature.
  2. Sieve the flour and baking powder. Put aside.
  3. Using a food processor, mix butter till you get light and fluffy. Add sugar and continue mixing. Add eggs, one after another, mixing till the ingredients link after every egg. 
  4. Add 'dry' ingredients (=flour and baking powder), stir, using a spatula. If the dough is too thick, so that it is hard to stir, add one tablespoon of milk, stir, till you get a thick dough, possible to be stir, but not liquid.
  5. Take your muffin form - if needed - put paper forms and put 
  6. Bake in the oven for 20-25 minutes in 190C till you get a 'dry toothpick'.
  7. Cool down.
  8. Bon Appetit! :)