Showing posts with label fruit. Show all posts

Monday, 17 November 2014

Sweet Meringue Plum Cake

I always wait so impatiently for plum season. I do love preparing plum cakes, they're always so delicious (even though I'm not really a plum-fan ;) )! I know I've waited too long to share this cake with You, but I hope that - at least for some of You - it is not too late :) Besides, it is possible to use frozen plums ;)
This is another wonderful and elegant cake from KwestiaSmaku, which I share with You today and also I do recommend to try this one, right after the very best plum cake, which You can find here.


Ingredients:

  • 250g of flour
  • 50g of sugar
  • pinch of salt
  • 1 teaspoon of baking powder
  • 200g of margarine
  • 4 egg yolks
  • 1kg of plums (without kernels, cut into halves) fresh or frozen (need to be defrost)

Budyń/Custard (it is possible to double the amount of custard in this cake):
  • 1 packaging of vanilla custard (40g)
  • 500ml of milk
  • 2 tablespoons of sugar

Meringue:
  • 4 egg whites 
  • 200g of sugar
  • 3 teaspoons of potato starch 


Optionally - one of these:
  • A handful of hazelnuts, to sprinkle the top (I skipped it)
  • almond flakes (to sprinkle the fruit) 
  • shredded coconut (to sprinkle the fruit or to mix with meringue)

Preparation:

Dough:
  1. Start preheating the oven to 170C.
  2. Prepare a rectangular baking pan (around 26x36 cm), grease it and put baking paper all over it.
  3. Take a big bowl, put flour, sugar, salt and baking powder inside. Mix. Add cold butter and knead till you get crumbles.
  4. Add egg yolks and knead again.
  5. Distribute evenly all over the bottom of previously prepared baking pan and bake in preheated oven for around 20 minutes, till it becomes gold.
  6. Take it out from the oven.
Custard + plums:
  1. Prepare the custard as the instructions on a packaging says (using 500ml of milk + 2 tablespoons of sugar). 
  2. When the custard is ready, pour it all over the previously baked bottom.
  3. Add plums, cover the entire cake bottom with them (there is no need to wait till the custard cools down). Make 2 layers of plums, one on another.
  4. Optionally - sprinkle with almond flakes or shredded coconut if desired. Set aside.
Meringue + finishing the cake:
  1. Take a mixer and its bowl, put egg whites inside, beat, adding sugar gradually, till it stiffens (around 10-15 minutes). At the end, sieve potato starch inside and mix till smooth.
  2. Here - if You haven't and You do fancy to do it - you can mix in some shredded coconut.
  3. Distribute the meringue all over the top of the plums.
  4. Bake for 20 minutes, setting the temperature as previously, on 170C.
  5. After 20 minutes, decrease the temperature to 60C, turn on the hot air cooking, (optionally sprinkle the top with hazelnuts) and bake for another 20 minutes.
  6. Take out from the oven.
  7. Bon Appetit! :)

Friday, 29 August 2014

Raspberry Charlotte Cake

This perfect cake has only perfect advantages :) perfectly literally! :) It is perfect for a gift, it looks gorgeous, tastes wonderfully, it is extremely easy to make and doesn't require using an oven :)
The recipe, slightly changed, comes from this website.


Notes:

  • Prepare this cake at least an evening earlier as it needs to stiffen in the fridge for a good few hours.
  • Please note that You need to use 16cm springform cake pan, unless the cake will be destroyed.
  • Make sure your springform pan is perfectly clean and do not use baking paper, as it will stick to the raspberry foam, get moist and after all, you'd end up with another cake layer, made of baking paper.


Ingredients:

  • 200 g of Savoiardi/ladyfingers (around the cake)
  • red, forest fruit (top)

Raspberry mousse (bottom):

  • 350g of raspberries (fresh or frozen - if so, defrost)
  • lemon juice from 1/2 of lemon
  • 1/3 glass of sugar
  • 2,5 teaspoon of powdered gelatin
  • 200ml of 36% cream, cool
Raspberry cream:
  • 250g of mascarpone cheese, cool 
  • 150ml of 36% cream, cool
  • 3 tablespoons of powdered sugar
  • 1,5 teaspoon of powdered gelatin + 30ml of hot milk
  • 150g of raspberries (fresh or frozen - if so, defrost)

Preparation:

Raspberry mousse:
  • Take a pot, put raspberries, lemon juice and sugar inside. Bring to boil, stiring from time to time.
  • Sieve, to get a mousse without small seeds. 
  • Dissolve gelatin in a small amount (a tiny little bit, just to cover the gelatin) of boiling water, stir so that it melts completely. 
  • Bring the mousse to boil again and add previously prepared gelatin. Stir precisely. Set aside, it needs to cool down completely.
When cooled down:
  1. Prepare a clean springform cake pan and keep it handy.
  2. Beat 36% cream for around 5-7 minutes with a mixer (till the whipped cream is stiff). Stop mixing and slowly, spoon after spoon, add cooled down mousse. Stir gently, till it all links.
  3. Pour the mousse to the springform. Cover for with foil and put in the fridge to let it stiffen for few hours.
When ready, prepare raspberry cream::
  1. Take a small bowl/pot, put 30ml of milk inside, heat till hot. Add 1,5 teaspoon of powdered gelatin and stir till it melts completely. Set aside so that it cools down.
  2. Take another bowl suitable for mixing and put mascarpone, 36% cream and powdered sugar inside. Beat till stiff. Add raspberries and cooled down gelatin(melted in milk). Mix till everything links.
  3. Put on the top of the cake, distribute equally all over. 
  4. Cool down in the fridge for another few hours.
Finishing:
  1. When stiff, take out from the fridge. Using a knife, cut the cake around, very close to the sides of the springform, to make taking it out from the springform easier. 
  2. Take ladyfingers, stick them around the cake (the mousse is sticky, ladyfingers will stick easily).
  3. Take a ribbon, decorate the cake with it, tying it around the cake.
  4. Decorate the top of the cake with (preferably) forest fruit.
  5. Store in the fridge.
  6. Bon Appetit! :)

Monday, 21 July 2014

Cherry Éclairs


Uhh, at first they seem so quick and easy, but the filling and final preparing them was more of a challenge :) However, the final outcome is really wonderful :) I gave a good plate for my brother, but before he reached his house, the plate was already empty ;) 
It would be a sin, not to recommend them ;)
This recipe is a mix of recipes from those two pages.


Ingredients:

Éclairs dough:
  • 250 ml of water
  • 125g of butter or margarine
  • 1 glass of flour
  • 4 eggs
  • a pinch of salt

Filling:
  • 200 ml of milk
  • 300g of cherries (fresh or frozen)
  • 3 egg yolks
  • 20g of flour
  • 20g of potato starch
  • 90g of sugar
  • 1 packaging of vanilla sugar
  • 1 tablespoon of butter

Icing:
  • 1 glass of powdered sugar
  • 4-5 tablespoons of water

Optional icing ingredients:
  • flavoured extract - vanilla, almond, lemon, etc.
  • food colouring
  • or - instead of icing - ganache, chocolate frosting

Optional ingredients - decoration:
  • cherry (or any other flavour - different fruit, caramel, chocolate, coffee, nut...) mousse
  • whipped cream
  • fruit
  • nuts
  • mincemeat

Preparation - dough:
  1. Take a baking tray, grease and put baking paper on it. Put aside.
  2. Take a pot, put water, butter and salt inside, boil.
  3. When brought to boil, add flour and stir energetically (to prevent the bottom from burning). The dough should be smooth and should not stick to the pot.
  4. Put aside, to let it cool down completely.
  5. When cooled down, mix the dough with eggs, for a quite long time, till smooth.* 
  6. Put the dough inside a syringe or a piping pastry bag with a steel piping nozzle (preferably quite big star shape).
  7. Distribute long pieces of cake, leaving some space between them, as they will grow quite much.
  8. Bake in the oven for 25-35 minutes, on 200C. Make sure they're ready inside.
  9. When baked, cool down and cut lengthways.
* Longer mixing helps it grow up in the oven later on, as there is no baking powder.


Preparation - filling:
  1. If your cherries are frozen - defrost, make sure there are no kernels, pour away the water.
  2. If fresh - throw away the kernels.
  3. Put the cherries in a bowl. Mix, with a mixer, till smooth, to get a mousse. If there's cherry juice, pour it away, for a different use.
  4. Take a pot, pour milk and add cherry mousse inside. Start boiling. When brought to boil, turn off the heat and put aside to let it cool down.
  5. Take a mixer and its bowl, beat the eggs with sugar and vanilla sugar. Add flour and potato starch. Using a spatula, mix precisely.
  6. Gradually add cherry milk mixture to the mixer's bowl, stiring precisely.
  7. Put the mixture back in the pot and start boiling. Stir all the time, as it will thicken, like a custard, quite fast. Be careful not to burn the bottom.
  8. When thick and ready, add butter and stir, to let the butter melt. Cover with foil and put aside, to let it cool down. Later on, when cool, keep in the fridge (it will thicken more), till you need it.

Preparation - icing sugar:
  1. Put all the ingredients together and stir to get a desired consistency of the icing (needs to be thick). 

Finishing:
  1. Prepare a baking grill or another baking tray, cover with baking paper, put aside.
  2. Take the top pieces of your Éclairs and dip in previously prepared icing. 
  3. Transfer them into steel baking grill or baking tray and leave for a while in the fridge.
  4. Put the cherry filling inside a syringe or a piping pastry bag with a steel piping nozzle (preferably quite big star shape) and distribute it on the bottom piece of your Éclair in any way desired. You can add fruit, whipped cream or use only the cherry filling.
  5. Cover with the suitable top piece covered with icing.
  6. Store in the fridge.
  7. Bon Appetit! :)

Sunday, 13 July 2014

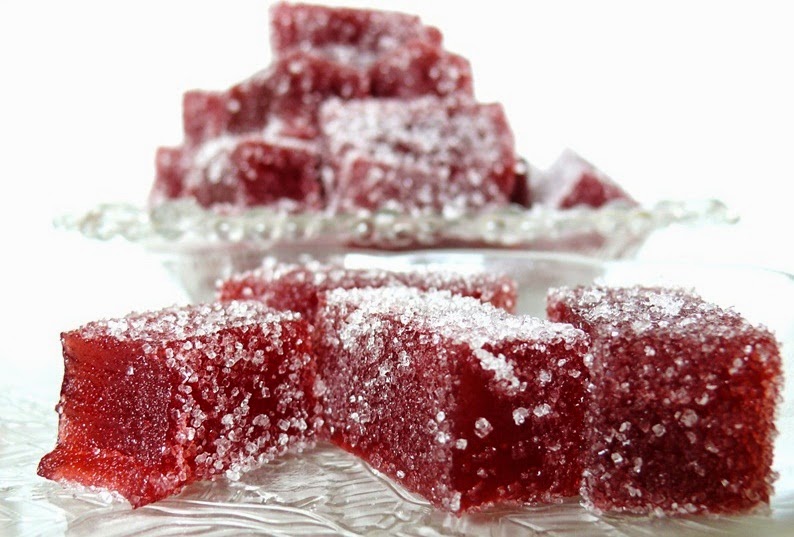
Fruit Jellies

Very tasty, fruity, healthy, natural jellies, possible to be prepared from many different fruit, especially, if you have no idea, what to do with them or when they are...way too ripe ;) 
Lack of artificial substances is undoubtedly their biggest advantage.
They might be sprinkled with sugar (though I prefer sugar-free jellies :) ). It is a quick, light and delicious form of confectionery. My little naphew's face and hands are all in strawberry jelly now, so I guess they're tasty, hi hi ;)
Recipe comes from this website.


Ingredients:
  • 30 g of gelatin
  • 1 glass of water
  • 1-2 glasses of sugar (it depends how sweet you want your fruit puree to be)
  • 1 teaspoon of lemon juice
  • 500-600 g of fruit (either frozen or fresh - preferably: strawberries, raspberries, blueberries, currants, cherries)*

* I mixed blueberries with strawberries, which is why they are so dark.


Optional ingredients:
  • sugar or powdered sugar - to sprinkle the jellies

Preparation:
  1. Take a bigger, clean pot and put the fruit inside. Boil for 15 minutes. Grate through the sieve, to seperate puree and kernels. 
  2. Take only 3/4 glass of the mousse** to prepare jellies. Put the glass with mousse aside.
  3. Take another pot, put gelatin inside and pour the water. Wait for 4 minutes. Heat, till all the gelatin melts (stir). Add 1-2 glasses of sugar, boil and  stir till the sugar melts. Add lemon juice. 
  4. Boil for around 10 minutes on a very low heat. Turn off the heat and leave the mixture for 5 minutes. Take away the foam if any appears.
  5. Mix with fruit mousse.
  6. Take a flat form, cover with cling film or foil. Pour the mixture inside. Put it in the fridge for around 12 hours, or till the jelly stiffens.
  7. After that time, take it out of the form and cut it in any shape you like - you can use only a knife to make small squares or cookie cutters to make shapes.
  8. Sprinkle with sugar/powdered sugar - preferably only those you want to eat now.
  9. Jellies can remain (in a closed box) in the fridge for max. 2 weeks. 
  10. Bon appetit! :)

Sunday, 15 June 2014

Puff pastry cookies with strawberries and Nutella

Are unexpected guests coming soon? Don't you have a clue what to put on the table? Are you organizing a party where sophisticated cakes aren't a suitable match? This is an easy, quick, and overtasty solution :) I do strongly recommend :) They're outrageous!
The recipe comes from this website, as usually, I changed a tiny little bit :)

Ingredients:
  • 1 packing of good quality ready made puff pastry
  • 1/2 jar of Nutella (or something very similar in taste to Nutella)
  • 100 g of strawberries
  • powdered sugar
Optional ingredients:
  • chopped pistachios (to sprinkle the top)

Preparation:

  1. If your puff pastry is totally frozen - defrost it. It needs to be in a room temperature (so that it won't shrink during baking).
  2. Take your puff pastry and using a shape cutter (in every shape you want, it doesn't need to be a heart shape) make as many shapes as you can from your puff pastry. Roll the leftovers of the puffpastry and use it as well. If the puff pastry is too sticky - use some flour (sprinkle it on the puff pastry and rolling pin)
  3. Put the cutouts on a baking sheet (remember to put the baking paper on your baking sheet)
  4. Put in the middle of every cutout 1 teaspoon of Nutella
  5. Take the strawberries and - optionally - cut them into halves.
  6. Put the strawberries on Nutella.
  7. Bake in 200 C for 15-17 minutes (may be ready faster - keep an eye on them - if the colour is gold - it is ready). Cool down.
  8. Add some powdered sugar on the top.
  9. Bon Appetit ! :)

Tuesday, 20 May 2014

Tropical Pavlova

I have no idea why I was hesitating for such long time... this is absolutely gorgeous... It exceeded all my expectations :) not only its appearance on the table is wonderful but the taste is just overdelicious! sweet meringue with tropical fruits! this is a real feast for senses ;) I do recommend! :) 
For those afraid of baking a meringue - here is a tip - you can buy a ready-made one in a good bakery ;) And they are probably available in a few sizes - you can make a couple of small pavlovas or one, very big :) all of them will be same delicious :)
Recipe for the meringue comes from this website, the rest is my idea, as Pavlova might be prepared in plenty different ways and will always taste good :)


Note: meringue and lemon curd might be prepared earlier. But - lemon curd must be stored in a closed box, in the fridge.

Ingredients:

Meringue:

  • 4 egg whites from 4 big eggs 
  • 250g of sugar 
  • 1 teaspoon of potato starch 
  • 1 teaspoon of white or rice vinegar 

Lemon curd:

  • 3 eggs 
  • lemon zest and lemon juice from 3 lemons 
  • 100g of powdered sugar 
  • 100g of cool butter 

Whipped cream:

  • 500 ml of 36% cream 
  • 2 tablespoons of powdered sugar 
  • 1-2 packages of powdered whipped cream (to stiffen the whipped cream, or polish smietan-fix*) 

* remember to stick to the proportions while using powdered products. If powder package says it is enough for 200 ml of cream/milk (no difference), and you're using 500ml of cream - add 2 packages.

Top:

  • Tropical fruit (any, tinned or fresh) 
  • peach 
  • mango 
  • passionfruit 
  • lychee 
  • pineapple 
  • guava 
  • ... :) 
  • a handful of shredded coconut, to sprinkle the top 

Preparation:

Meringue:

  1. Preheat the oven to 120C (without convection, just this time) 
  2. Prepare a baking sheet, cover with baking paper. Draw a circle (diameter: for M size eggs - 18 cm, for L size eggs - 20 cm). Put aside. 
  3. Take a mixer and its bowl, put egg whites inside, start beating. After a while, start adding sugar, one tablespoon after another, stiring precisely all the time. The beating should take 10-15 minutes, not less. The meringue after the beating should be stiff and shiny. 
  4. When done, add potato starch and vinegar and beat for another few minutes so that it links. 
  5. Using a spoon or spatula, distribute the meringue on the baking sheet, on the drawn circle. Pull up the sides. (please don't play with it much, just few good moves, because the meringue might be destroyed). 
  6. Put in the oven and bake for 30 min in 120C. After that time, lower the temperature to 100C and bake for another 3 hours. 

Lemon curd:

Lemon curd requires a 'bath' so it is necessary to have a suitable pot and a bowl, that can be put one on another.

  1. Chop the butter into smaller pieces. 
  2. Take a pot, put some water inside, start boiling it. 
  3. Take a bowl that matches the pot, put eggs inside, beat. 
  4. Add lemon juice, lemon zest, powdered sugar and stir till everything links and there are no lumps. 
  5. Now put the bowl on the top of your pot (make sure the bowl stands out from the pot so that you don't get burn) and slowly keep heating up the mixture (don't boil it). 
  6. Keep adding the butter, one piece after another, stiring after adding. 
  7. When all the butter is melted in the mixture, turn off the heat and put the bowl with lemon curd somewhere aside, to let it cool down. 
  8. Then put your lemon curd in the fridge so that it stiffens more. 

Finishing:

  1. Prepare fruit. If fresh - wash, peel (if necessaroy) and chop. Dry them on a paper towel. Put aside for a while. If tinned - half of the job is already done - just chop and dry. 
  2. When the meringue is baked and cooled down, distribute cooled down lemon curd all over the top. 
  3. Now, prepare whipped cream going through the steps below:

    Whipped cream: 
    1. Before preparing the whipped cream make sure your cream is really, really cool (I always put it in the freezer before beating, for around 10-15 minutes). 
    2. Take a mixer and its bowl, put cream inside, start mixing. After a while add powdered sugar and something to stiffen it (powdered whipped cream/smietan-fix). 
    3. Beat for around 10 minutes (depending on the power of a mixer it might take more or less time, keep paying attention not to make butter).

  4. Distribute whipped cream all over the top. 
  5. Just for the sake of safety, dry all the fruit again on a paper towel, before putting them on the meringue with whipped cream (as the juice from fruit may destroy both whipped cream and meringue). Make any pattern you wish out of the fruit. 
  6. Sprinkle with shredded coconut. 
  7. Store in the fridge. 
  8. Bon Appetit! ;) 

Monday, 21 April 2014

(Easter) Peach Muffins

Very nice ones, might serve Easter occasion easily :) I like the taste - sweet, thanks to soft, delicate whipped cream, moist cake with delicious fruit and to make a nice contrast to that sweetness -sour lemon curd. Mmmm!
These might be filled with different ingredients. The original recipe is with advocaat, though for the sake of children and family members who needed to drive a car, I made them with peaches :) The dough is actually weird - it is very thick and sticky, but after baking turns out very nice - soft and moist (that's probably thanks to peaches ;)). I know you might be tempted to make a swiss buttercream for the top, but I'd recommend stiff whipped cream, as buttercream would make them very heavy.
To prepare these cute cupcakes I mixed recipes from here and here and added a little bit of my own creativity ;)

Ingredients:


Muffin dough:

  • 120g of butter
  • 110g of sugar
  • 2 big eggs (or 3 smaller ones)
  • 200g of flour
  • 2 teaspoons of baking powder
  • 3 teaspoons of advocaat (for the dough, not for the filling, but this is optional, I skipped it)

Filling - ideas:
  • 1 tin of peaches cut into smaller pieces (and a little bit dried on a paper towel)
  • advocaat
  • vanilla custard (previously prepared, for example from this recipe)
  • lemon curd 
  • apricot

Lemon curd:

Ingredients:

  • 3 eggs
  • lemon zest and lemon juice from 3 lemons
  • 100g of powdered sugar
  • 100g of cool butter

Topping:
  • 250ml of 36% cream
  • 1-2 tablespoons of powdered sugar
  • something to stiffen it - either so-called 'smietan-fix' or for example 'fake-powdered-whipped cream' (a powder you mix with milk to get a whipped cream ;) it stiffens the cream as well) or 1 teaspoon of gelatin - though here be careful not to make lumps

Preparation - muffin dough:
  1. All the ingredients should be in room temperature.
    During that time you can prepare your muffin tins, greasing them with butter or just simply putting paper muffin cases into every hole. If you decided to use peaches - open the tin, take everything out of it as it isn't healthy to keep food in an open tin, separate the syrup from the fruit. Using a paper towel, dry the fruit and chop into smaller pieces.
  2. Sieve the flour with baking powder and put aside.
  3. Take a mixer and its bowl. Chop the butter into smaller pieces, add sugar and mix till you get a bright, fluffy mixture.
  4. Add eggs, one after another, mixing precisely after adding one.
  5. Add flour with baking powder, mix on a low rotation till everything links. 
  6. Here you can add advocaat to the dough and mix till it links or you can skip that step.
  7. Using a teaspoon, put some dough (+ - 1 teaspoon) to every paper case. Then add the filling and cover with another teaspoon. Don't be afraid while adding the filling - it is really fine to put quite a lot of it (I added 4 peach pieces into every muffin and they seem to get lost in the dough anyway ;))
  8. Put the muffins in the oven for around 15-20 minutes, on 180C, till they get gold and the toothpick is dry.
  9. Cool down.

Preparation - lemon curd:

Lemon curd requires a 'bath' so it is necessary to have a suitable pot and a bowl, that can be put one on another.
  1. Chop the butter into smaller pieces.
  2. Take a pot, put some water inside, start boiling it.
  3. Take a bowl that matches the pot, put eggs inside, beat.
  4. Add lemon juice, lemon zest, powdered sugar and stir till everything links and there are no lumps.
  5. Now put the bowl on the top of your pot (make sure the bowl stands out from the pot so that you don't get burn) and slowly keep heating up the mixture (don't boil it). 
  6. Keep adding the butter, one piece after another, stiring after adding.
  7. When all the butter is melted in the mixture, turn off the heat and put the bowl with lemon curd somewhere aside, to let it cool down.
  8. Then put your lemon curd in the fridge so that it stiffens more.
Preparation - topping:
  1. Before preparing the whipped cream be sure your cream is really, really cool (I always put it in the freezer before beating, for around 10-15 minutes).
  2. Take a mixer and its bowl, put cream inside, start mixing. After a while add powdered sugar and something to stiffen it.
  3. Beat for around 10 minutes (depending on the power of a mixer it might take more or less time, keep paying attention not to make butter).

Finishing - cupcakes:
  1. When everything is cooled down and ready, using a teaspoon, take some of the whipped cream and start distributing it all over the top of your muffin. In the middle top, make a small hole for lemon curd.
  2. When all the whipped cream is distributed, put your muffins in the fridge, so that the cream stiffens a little before adding lemon curd.
  3. Then, using a syringe or a teaspoon, put some lemon curd into previously prepared holes in whipped cream. 
  4. Keep in the fridge.
  5. Bon Appetit ;)

Thursday, 23 January 2014

Mascarpone Pancakes

That's a very tasty idea, for instance for those of you who don't eat meat on friday or enjoy eating something cruelly sweet while drinking coffee ;)

Ingredients:

Pancakes:
  • 160g of flour
  • 300ml of 3,2% milk
  • 2 eggs
  • 2 tablespoon of sugar
  • 16g of vanilla sugar
  • pinch of salt
  • 30g of melted, cooled down butter

Filling (optional):
  • 250g of mascarpone cheese + 2 tablespoons of powdered sugar
  • chocolate and caramel sauces
  • almonds
  • fruit

Preparation:
  1. Take a mixer and its bowl. 
  2. Put flour, milk, eggs, sugars and salt inside, mix till smooth.
  3. Add melted butter, mix till smooth again. Put aside.
  4. Take another bowl. Put mascarpone cheese and powdered sugar inside. Mix with a fork or spoon, gently, a little.
  5. Take a quite big frying pan(flat one, preferably), grease it with oil, and using a paper towel, distribute the oil on the entire frying pan.
  6. Turn on the heat so that it heats up.
  7. Put some dough on the pan and distribute it immidiately on the entire frying pan, to make a thin pancake.
  8. Fry for few minutes on both sides.
  9. Put the pancake on a plate.
  10. Distribute mascarpone mixture on the entire pancake surface. Add caramel sauce.
  11. Fold the sides of the pancake, then its bottom and at the end the top.
  12. Overturn. Decorate with chocolate sauce, almonds, fruit.
  13. Bon Appetit!

Sunday, 15 December 2013

Orange-Chocolate Cheesecake


I was pretty unsure about this Cheesecake as I was doing it completely on my own and I was afraid of many, many things. But... I served it and all the guests were stunned! Asking where did I buy it. And they were even more shocked when I told them that I did it on my own :) And everyone, literally, everyone asked for the recipe! That's the best award I could have got for that cheesecake :) So now I'm sharing the secret for a perfect Christmas Cheesecake with You :) 
Some details: This cheesecake has a consistency of a mousse, so it melts on a palate, it's quite refreshing, because of oranges and what is its biggest advantage - it's easy and quick to prepare, because without turning on the oven ;) Enjoy! :)


Bottom of the cake:
  • 200g of chocolate shortbread-like biscuits
  • 80-100g of melted butter

Cheesecake: (all the ingredients must be in a room temperature except for water)
  • 500g of cheesecake cheese (might be vanilla flavoured)
  • 250g of mascarpone cheese
  • 250ml of 36% cream
  • 100-140g of powdered sugar* 
  • 1/2-1 teaspoon of orange extract
  • 100g of orange skin
  • 40g of powdered gelatin
  • 140 ml of boiling water

Decoration:

*About the powdered sugar: here are two nice propositions. First one, is to add a lot of powdered sugar to the cheesecake - around this 140g. If so, the cheesecake mousse is really sweet. But, it is also a good idea, to add only around 90-100g of powdered sugar and after the cake is done, to distribute Royal Icing(recipe is here) on the top of the cake.

Preparation:

Bottom:
  1. Take a springform cake tin. 
  2. Put baking paper on the bottom of the tin.
  3. Take the cookies and crumble them on a very small, sand-like pieces.
  4. Mix precisely with butter. It needs to have a consistency of a wet sand.
  5. Put in a tin, align, make smooth, knead.
  6. Put in the fridge for at least 20 minutes.

Cheesecake:
  1. In a glass, mix gelatin with hot water and stir till gelatin melts completely. Put aside so that it cools down.
  2. Take a mixer and its bowl. Put cheesecake cheese inside, add mascarpone, cream and mix till completely smooth.
  3. Add powdered sugar and orange extract and mix till smooth again (it is advisable to taste the cheesecake to check if it is sweet enough).
  4. Take a spoon. Take around 3 tablespoons of the cheesecake mixture and mix with gelatin. Stir precisely, it needs to link.
  5. Put the gelatin-cheesecake mixture back in a mixer's bowl. Mix precisely.
  6. Add orange skin and mix again.
  7. Pour on the bottom. Put in the fridge till it stiffens.
  8. If desired - add icing and decorate for example with oranges, anise.
  9. Keep in the fridge.
  10. Bon Appetit! :)


Ciasta bez pieczenia


Sunday, 3 November 2013

Piña Colada Cake

Well I decided to make a birthday gift for myself. What could it be? Self-made cake seemed to be a perfect idea :) And so it was :) Soft sponge cake, refreshing pineapple, mouth-watering, sweet cream and tongue tickling shredded coconut. What else do a palate need? ;)
Recipe comes from Kwestia Smaku.


Some useful tips on 'before baking':
  • It is better to use fresh pineapple, not tinned one.
  • While mixing the sponge cake, remember to mix only in one direction!
  • It is possible to prepare the sponge cake one day earlier.
  • Actually, preparing the entire cake one day earlier is a fantastic idea - the cake is getting better and better with time! 
  • A good idea to cut the sponge cake is to use a thread.
  • It is possible to prepare that cake in non-alcohol version - don't impregnate the sponge cake with anything.
  • If the coconut liqueur is unavailable, it is also a good idea to use rum.
  • Instead of ricotta cheese it is possible to use ground curd cheese.
  • About coconut milk: shake before opening the tin. If there is a transparent liquid - highly probably this coconut milk is useless and preparing the coconut cream will be impossible. It needs to be white, milk-like liquid, as the title says: 'coconut MILK' not 'coconut water'.

Ingredients:

Sponge Cake:

  • 7 eggs
  • 1 glass of sugar
  • 1 glass of flour
  • 1/3 glass of potato flour
Pineapple Mousse:
  • 2 pineapples
  • 2 tablespoons of coconut liqueur
  • 2 flat tablespoons of potato flour
Coconut Cream:
  • 1 (400ml) tin of coconut milk
  • 1/4 glass of coconut liqueur
  • 1 glass of sugar
  • 500g of mascarpone cheese
  • 250 g of ricotta cheese
Impregnating the sponge cake:
  • 6-9 tablespoons of rum
Decoration:
  • Shredded coconut
  • pineapples leaves (if they are in good visual condition)

Preparation:

Sponge cake:
  1. Take a springform cake tin, grease it and put the baking paper on the bottom. Grease the sides of the tin.
  2. Take a bowl, mix flour with potato flour inside.
  3. Start heating the oven to 170C.
  4. Take a mixer and its bowl, separate egg whites from yolks so that egg whites are inside the mixer's bowl and yolks are - for example - in a glass.
  5. Stir the yolks. Put aside and leave the spoon inside the glass.
  6. Start beating the whites on a low rotation for 2 minutes. 
  7. After those 2 minutes start adding sugar (gradually, one tablespoon after another).
  8. Continute beating the whites on the highest rotation till stiff and shiny (around 7-10 minutes).
  9. Without stopping the mixer, start adding the yolks (gradually, one spoon after another - another goes when the previous links perfectly with egg whites).
  10. Stop the mixer.
  11. Divide flours into 3 parts and add first part to the mixer's bowl. Stir very gently (not to destroy the foam) with a spoon till it links. After that, add the second part, stir and the third - stir again. (It is very important to stir slowly and precisely cause very often, in the middle or on the bottom of the bowl there is unlinked flour).
  12. Pour the dough into previously prepared springform cake tin and bake for around 35 minutes in 170C.
  13. After that time take it immidiately out of the oven, and throw on the kitchen's surface. Cool down.
  14. When the cake is cold take a knife and cut the sides very near to the springform cake tin side, so that the cake can be taken out easily from the springform cake tin.
  15. Now cut the sponge cake into 3 parts - using a knife or a thread.
Pineapple Mousse:
  1. Cut the pulp, throw away the skins and hard, middle parts of both pineapples. 
  2. Take one pineapple, cut the pulp into cubes and put inside a pot, add liqueur and start heating on a low heat for around 30 minutes, stiring from time to time not to let it burn. 
  3. Cut the second pineapple into cubes as well and put aside.
  4. Mix (using for example a blender) the boiled pineapple, add the second pineapple cut into cubes and start heating again. 
  5. Take a glass, put a little water inside. Add potato flour, stir.
  6. Add potato flour from the glass to the pot with pineapples. Boil till the mousse becomes really thick, like a jam.
  7. Cool down.
Coconut Cream:
  1. Take a pot. Put coconut milk and liqueur inside, add sugar and stir till the sugar melts.
  2. Boil on an average heat for around 30-40 minutes till the substance getsreally thick (like a gum).
  3. Cool down a little bit (it can't be cooled down completely cause it will be impossible to use it).
  4. Take a bowl, put mascarpone and ricotta cheese inside. 
  5. Using a mixer, mix it on a slow rotation. One spoon after another, keep adding coconut 'gum' while still mixing everything on a very slow rotation and make sure it links with both ricotta and mascarpone.

Preparing the cake:
  1. Put the bottom sponge cake piece on a desired plate (it won't be possible to change the plate after preparing!).
  2. Sprinkle with rum, put 1/2 of the pineapple mousse on it and 1/3 of the coconut cream. 
  3. Put another piece of sponge cake on it. Sprinkle with rum, put the rest of pineapple mousse on it and 1/2 of the coconut cream (leave 1/2 of the coconut cream for the sides and the top of the cake).
  4. Put the last piece of sponge cake on the top, sprinkle with rum, put coconut cream all over the cake - top and sides and sprinkle with shredded coconut (unlimited technique).
  5. Decorate the top of the cake with the pineapple leaves - if possible.
  6. Keep closed in a cake box, in the fridge.
  7. Bon Appetit! :)