Showing posts with label for children. Show all posts

Sunday, 7 December 2014

Citrus Snowballs

Here is another sweet recipe for cold, winter evenings at home. These snowballs are surprisingly tasty, sweet, orange, crunchy cookies which will be a good match for hot tea/cocoa, blanket aaand book or dreams ;)
Also, if you're running out of time, they're very easy and quick to make which gives them another big +. 
Sprinkled with powdered sugar or glucose, look like a snowball on a table :) And children will love them! Just make sure they're not using them as snowballs ;)
There original recipe is here, though I've made quite a lot of changes, such as replacing butter with margarine which I tend to do very often recently.


Ingredients:

  • 250g of margarine
  • 100g of powdered sugar (+ more to sprinkle the cookies)
  • 1 teaspoon of orange extract
  • 100g of chopped walnuts
  • 100g of candied orange skin
  • 375g of flour

Preparation:
  1. Prepare a baking tray and put baking paper all over it.
  2. Start preheating the oven to 180C.
  3. Take a mixer and its bowl. Put margarine and powdered sugar inside and beat till bright and fluffy (around 10 minutes).
  4. Add orange extract, walnuts, candied orange skin and mix till well combined.
  5. Add flour and mix (or knead) again till well combined.
  6. Start making balls (around 2 teaspoons of dough for 1 ball) and place on previously prepared baking tray (they might be placed close to each other as they won't grow).
  7. If the oven is ready, bake for 10-15 minutes till golden brown.
  8. Cool down on a wire rack.
  9. Sprinkle with powdered sugar.
  10. Bon Appetit!

Friday, 28 November 2014

Bajadera Reindeers

Bajadera is always a fantastic, last second idea which always works and always tastes delicious :)
I do recommend them, especially when you have no time and your oven is tired ;) it doesn't require baking ;) I do apologize for the bad quality of the picture, so let me say that the taste and children's smiles will make it up to You :)
Another wonderful use of bajadera, a little bit easier than reindeers, but also Christmas-themed You can find here.
Quite changed recipe comes from this website.


Ingredients:

Base:
  • 400g of dried pound cake (preferably lemon or vanilla flavoured)
  • 120g of mascarpone cheese
  • 80g of nutella
  • 350g of milk chocolate
  • favourite mincemeat (including for example nuts, almonds; or baking cocoa)
Reindeers:
body parts:
  • nose: 1 pack of red small round sprinkles, 
  • horns: 1 pack of pretzels, cut into halves, 
  • eyes: frosting deco pens
  • some small plastic sticks
  • ribbons for decoration


Optional ingredients:
  • 10-25ml of Rum
  • dried fruit - but in very small pieces

Preparation:
  1. If your pound cake isn't dried enough, it is a good idea to crumble it into very small pieces and put it in the preheated oven(over 180C) for a couple of minutes.
  2. Take a mixer and it's bowl. Put mascarpone cheese and nutella inside. Mix till smooth.
  3. Put dried pound cake to the bowl and mix everything till smooth. 
  4. Here is the time to add and mix optional ingredients if desired.
  5. Cover with foil and cool down in the freezer for 45 minutes.
  6. During that time, prepare a rectangular bakewell pan or loaf tin or - something that you can put in your freezer. Put some baking paper on its bottom (if You have a sponge suitable for making cake pops - use it here).
  7. Take the dough out from the freezer and start making small balls, put each of them in previously prepared pan/tin.
  8. Put back in the freezer for another 15 minutes.
  9. During that time, take a pot, put chocolate (in small pieces) inside and melt on a very low heat.
  10. Dip 1/3-1/2 of every stick in the melted chocolate and put in the middle of every ball.
  11. Put it back in the freezer for another 20-30 minutes.
  12. Prepare a sponge (to dig reindeers in it) and elements of decoration around you.
  13. Take one ball from the freezer, dip in the chocolate, so that it covers the entire ball, take out, wait till the excess of chocolate falls down.
  14. As the ball is very cold, the chocolate will stiffen on it very fast, so as soon as you take it out from the pot, decorate it, starting with horns and dig it in the sponge.
  15. Repeat with all the balls.
  16. At the end, decorate with ribbons.
  17. Store them in the fridge.
  18. Bon Appetit! ;)

Thursday, 27 November 2014

Walnut Circles

These are very nice, crunchy cookies, which might be prepared in any shape desired, if only You have a cookie cutter :) Margarine gives all of the bakery that characteristic, outrageous taste that makes you want another cookie :) I think they're wonderful for kids, especially when cut in a nice, (now) Christmas-theme shape :) Of course it is possible to decorate it with icing sugar, making Snowmen, Santas, Reindeers and other wonders (yes, yes, pinterest appears to be very helpful here ;) ), if only You have enough time and stomachs enjoying very sweet cookies.
Slightly changed recipe comes from this website.


Ingredients:
  • 150g margarine
  • 75g of powdered sugar
  • 230g of flour
  • 1 egg yolk
  • a pinch of salt
  • 1 teaspoon of vanilla or orange extract
  • 75g of walnuts, chopped
  • 75g of candied orange skin


Preparation:
  1. Take a big bowl, put margarine, powdered sugar, flour, egg yolk, salt and extract inside and knead.
  2. Add walnuts and orage skin.
  3. Prepare a baking pan, cover with bakig paper.
  4. Start preheating the oven to 200C.
Here - two methods:
  1. For circles - divide the dough into 2-3 pieces and make cylinders (the diameter of the cylinder is the diameter of the cookie), put in the freezer till it completely freezes. 
  2. When ready, cut into slices, around 0,5-1 cm thick. The dough won't grow, so the cookie will look absolutely the same.
  3. For cookie cutter shapes: put in the freezer till it is really hard but not completely frozen.
  4. Take the rolling pin and roll out the dough to 0,5-1cm thick (use a little flour if neccesary). 
  5. Cut the shapes.
  6. Put the cookies on a baking pan, bake for 10 minutes in 200C.
  7. Cool down, decorate with icing sugar if desired.
  8. Bon appetit! :)

Friday, 21 November 2014

Winter Snowballs

Winter is coming, snow is slowly falling down from the sky and what's more important Christmas is coming as well, so here is another sweet recipe for cold winter evenings at home. These are surprisingly tasty, sweet, cinnamon crunchy cookies which will be a good match for hot tea, cocoa and blanket ;) Another huge advantage - if you're running out of time, these are very easy cookies and quick to make. Sprinkled with powdered sugar or glucose, look like a snowball on a table :)
There original recipe is here, though I've made quite a lot of changes, such as replacing butter with margarine which I tend to do very often recently.


Ingredients:

  • 250g of margarine
  • 100g of powdered sugar (+ more to sprinkle the cookies)
  • 1 teaspoon of vanilla extract
  • 1,5 teaspoon of cinnamon
  • 100g of chopped walnuts
  • 100g of candied orange skin
  • 375g of flour

Preparation:
  1. Prepare a baking tray and put baking paper all over it.
  2. Start preheating the oven to 180C.
  3. Take a mixer and its bowl. Put margarine and powdered sugar inside and beat till bright and fluffy (around 10 minutes).
  4. Add vanilla extract, walnuts, cinnamon, candied orange skin and mix till well combined.
  5. Add flour and mix (or knead) again till well combined.
  6. Start making balls (around 2 teaspoons of dough for 1 ball) and place on previously prepared baking tray (they might be placed close to each other as they won't grow).
  7. If the oven is ready, bake for 10-15 minutes till golden brown.
  8. Cool down on a wire rack.
  9. Sprinkle with powdered sugar.
  10. Bon Appetit!

Tuesday, 18 November 2014

Reindeers (Cupcakes)


Those Reindeers are literally galloping to your plate ;) Christmas-like cinnamon taste, delicate dough with sweet buttercream, sweet cherry and salty ears :) Not only they look wonderful but they will also take your palate and stomach straight to heaven ;)
Original recipe - idea comes from this website, though I made some changes, the main change is the top - not whipped cream but Martha's -a-little-bit-changed buttercream.
What's more, children will definitely love them as much as those Christmas Trees! The buttercream I used is more resistant to warm temperatures (one of my reindeers remained in a room temperature for the entire evening plus night and the next day it looked same cute).

I do honestly recommend all of these wonders for the upcoming Christmas :) I promise You will not be disappointed ;)


Ingredients (all of them need to be in room temperature):

  • 3 glasses of flour
  • 1 tablespoon of baking powder
  • a pinch of salt
  • 1 tablespoon of cinammon
  • 230g of butter
  • 1,5 glass of sugar
  • 4 big eggs
  • 2 teaspoons of vanilla extract
  • 1 and 1/4 glass of milk

Swiss meringue buttercream:

  • 4 egg whites
  • 1 glass of white sugar
  • a pinch of salt
  • 300g of butter, in a room temperature, chopped into small cubes
  • 1 teaspoon vanilla extract

Body parts :)

  • candied cherries (optionally cut into halves) - nose
  • pretzels, cut into halves - horns
  • any hard, small, edible white (chocolate) balls or small edible eyes, if available - for eyes


Preparation:


Dough:
  1. Prepare paper muffin cases and muffin tins.
  2. Take a quite big bowl, sieve flour, baking powder, salt and cinnamon inside, set aside.
  3. Take a mixer and its bowl, whisk butter and sugar till it becomes bright and fluffy.
  4. Gradually add eggs, mixing after adding each of them.
  5. Add vanilla extract and mix again.
  6. At the end, take turns at adding the 'dry', sieved ingredients from the bowl and milk. Repeat till both ingredients are mixed inside. 
  7. Distribute the dough evently into every paper muffin case (to its 3/4 height).
  8. Bake in 180C for around 20 minutes, till they get gold (check with a toothpick).
  9. Cool down.
Swiss meringue buttercream:
  1. Take a heatproof bowl, put egg whites and sugar inside. Prepare a 'bath'.* Keep stiring and heating the mixture over a steam of a boiling water till the sugar completely melts.
  2. Cool the mixture down. 
  3. Put the egg white mixture in the mixer's bowl and beat for around 10 minutes to get a white, shiny, stiff meringue.
  4. Start adding the butter, one piece after another, mixing after adding every piece. While adding it may look like it is curdled, but don't panic, it's perfectly fine :) (it shall take around 5 more minutes).
  5. When the mixture is stiff and all the butter is mixed, add vanilla extract, mix.

Finishing:
  1. Take a pastry bag with a star-like tin nozzle, put the buttercream inside and start distributing on the muffin.
  2. Start from the middle of the muffin and making circles go it its edge.
  3. Decorate with...body parts of your reindeer :)
  4. Bon Appetit! ;)


*A bath is simply heating the ingredients over a steam (but not boiling them in a water), just keeping them over a pot with boiling water, in a heatproof bowl.

Tuesday, 4 November 2014

Rafaello vol.2

I had some packs of crackers left and I needed a cake, extremely quickly with short preparation time. So I decided to upgrade the basic recipe and here it comes! It is definitely better than the previous one :)

Ingredients: (for a small rectangular pan, otherwise there's not enough cream, but You can double the ingredients and make double cream, then You'll also need more crackers)


  • 1 litre of 3,2% milk
  • 2 vanilla powdered custards, 40g each (or double the recipe for this budyń, recipe here ;) )
  • 2 tablespoons of potato starch
  • 3/4 glass of sugar
  • 2-3 vanilla sugars (16g each)
  • 1-3 tablespoon of Amaretto Syrup
  • 1 egg yolk
  • 250g of margarine
  • 100g of shredded coconut 
  • 2-3(3-5 if bigger pan) packs of crackers (rectangular shape)
  • 330 ml of 36% cream  (or artificial, powdered one)
  • 1/3 glass of powdered sugar

Optional ingredients:
  • almond flakes, for sprinkling the top

Preparation of budyn/custard:

For those of You, who has powdered custard, follow the steps below, if You can't buy powdered budyn/custard then follow all the steps in that recipe, just remember to double all the ingredients.
  1. Take a glass, fill 3/4 of it with milk. Add powdered custard and potato starch. Stir till smooth (no clumps please!)
  2. Take a pot, put all the remaining milk in there, add sugar, start boiling. Stir from time to time to help the sugar dissolve. Bring to boil and add the mixture from the glass. Lower the heat, stir energetically till it turns thick. Cool down.
Now, when the custard is ready: 
  1. Using a stand mixer, mix butter with egg yolk, adding cooled down custard, one tablespoon after another.
  2. Add Amaretto syrup, gradually, mixing and tasting after every tablespoon to check how strong the Amaretto taste is for You.
  3. Add shredded coconut, mix till it links.
  4. Take a rectangular pan - preferably a rectangular springform pan (no baking paper inside is necessary, in both cases).
  5. Put one layer of crackers and start adding some part of the cream, to cover the entire crackers layer.
  6. Put another layer of crackers and cream - repeat till all the ingredients are used, the last layer are crackers.
Now prepare the whipped cream:
  1. Before preparing the whipped cream make sure your cream is really, really cool (I always put it in the freezer before beating, for around 10-15 minutes). 
  2. Take a mixer and its bowl, put cream inside, start mixing. After a while add powdered sugar and something to stiffen it (powdered whipped cream/smietan-fix). 
  3. Beat for around 10 minutes (depending on the power of a mixer it might take more or less time, keep paying attention not to make butter).
  4. Distribute whipped cream all over the top.
  5. Cover the cake with foil, put in the frigde for at least 3 hours.
  6. Bon Appetit! ;)

Monday, 3 November 2014

Carrot Cake #1

When the owner of MojeWypieki says this is the best carrot cake you've ever eaten, then... it really is the best carrot cake you'll ever eat, if you decide to prepare it. What a taste, my Godness! I can't believe how quickly did this cake disappear! I'm lucky I managed to snap some pictures for You!
This is a must-bake. It looks wonderful, it is possible to decorate it in many different ways, it can also be served as a birthday cake. 
What's more, the wonderful taste - thanks to all the spices - gives it a little bit an aroma of Christmas... :)
Here is the source, I changed it just a little bit :)

Before baking:

  • This cake is for a small springform (diameter -> 20 cm), if You wish to make it much bigger, it is neccessary to double all the ingredients.


Ingredients:

For the dough:
  • 2/3 glass of flour
  • 1/2 glass of sugar
  • 1 teaspoon of baking soda
  • 1 teaspoon baking powder
  • 1 teaspoon of cinammon
  • 1/4 teaspoon of ground cloves
  • 1/4 teaspoon of nutmeg
  • 1/4 teaspoon of salt
  • 1/3 glass of oil 
  • 2 eggs, beaten
  • 1 glass of walnuts, chopped
  • 1/2 glass of chopped pineapple (fresh or tinned one)
  • 1 full glass of ground carrots
For the filling&top:
  • 250g of philadelphia cheese
  • 6 tablespoons of butter (room temperatured)
  • 1,5 glass of powdered sugar, sieved
  • 1/2-1 teaspoon of vanilla extract
Decoration ideas:
  • Any pattern desired made of cinnamon powder or cocoa
  • Walnuts
  • Edible carrots
  • Chocolate flowers
  • ... :)

Preparation:
  1. All the ingredients needs to be room temperatured.
  2. Take a springform, grease it and put baking paper all over. Set aside.
  3. Take one big bowl, sieve into it all the 'dry ingredients' inside (flour, sugar, salt, baking powder, baking soda, spices)
  4. In another bowl, beat eggs and oil.
  5. Mix both bowls, add carrot, walnuts, pineaples and stir precisely with a spoon.
  6. Pour the dough into the springform and bake in 175C for 30-40 minutes (to the point when the toothpick comes out dry).
  7. Set aside, in the springform, to let it cool down.
  8. Meanwhile, prepare the filling&top.
  9. Take a mixer and its bowl, put all the ingredients inside and mix till bright. (It is advisable firstly to add 1/2 teaspoon of the extract and check if it isn't already too strong).
  10. When the cake cooled down completely, open the springform and cut the cake lengthways into two pieces.
  11. Put half of the filling on the first piece of cake, cover with the other one, distribute the remaining filling on the top and decorate.
  12. Keep in the fridge (though the filling is strong and will remain as beautiful as it is in a room temperature for a quite long time).
  13. Bon Appetit ! :)


Sunday, 2 November 2014

Best Brownies


I'm playing with 'The very hungry caterpillar' story in a kindergarten with children, we're learning about food, I give them different food to taste (connected with a story) and here we are in front of a chocolate cake, one of the things a catepillar ate in that story. So I decided to bake them one. I chose that brownie, hesitating a little - I wasn't sure if it will be good for them - it is 70% chocolate, hmmm, they might not like it... 
I was amazed at the lesson, when they were saying 'chocolate cake please' with their mouth full of previous piece :D so - brownie tested - children will definitely love it ;)
P.S. Oh, it simply must be delicious ;) It's Martha's favourite :) I changed the original recipe a little bit :)


Ingredients:
  • 1 cup (2 sticks) of margarine, cut into small pieces + more to grease the baking pan
  • 2/3 cup  flour + some more to sprinkle the baking pan (alternatively, it is also good to use cocoa powder)
  • 1/2 teaspoon of salt
  • 12 ounces of 70% chocolate, chopped
  • 1 1/4 cups of packed light-brown sugar
  • 4 large eggs
  • 1 tablespoon of vanilla extract


Preparation:
  1. Grease a smaller baking pan. Dust with flour/cocoa. Tap out excess and set aside. 
  2. Sieve flour and salt in a small bowl, set aside as well.
  3. Take a non-stick pot, put chocolate and margarine inside and boil on a very low heat, so that it won't  burn. Instead, you can make a 'bath'. Stir from time to time. When done, pour to a different pot/bowl and set aside (or keep stiring), to let it cool completely.
  4. Start preheating the oven to 190C. 
  5. When the chocolate is completely cool, take a mixer's bowl, put sugar and eggs inside and beat on a high speed till bright (3-5 minutes). Reduce speed to low and add chocolate mixture and the vanilla. Add flour. Mix only till it is well combined.
  6. Distribute the mixture all over the pan, prepared at the very beginning. 
  7. Bake for 20-30 minutes (until top of the brownie has cracked and its center is soft or until the toothpick comes out with moist crumbs). 
  8. Let it cool completely. 
  9. Cut into squares.
  10. Store in an airtight container up to 2 days.
  11. Bon Appetit! :)

Friday, 29 August 2014

Raspberry Charlotte Cake

This perfect cake has only perfect advantages :) perfectly literally! :) It is perfect for a gift, it looks gorgeous, tastes wonderfully, it is extremely easy to make and doesn't require using an oven :)
The recipe, slightly changed, comes from this website.


Notes:

  • Prepare this cake at least an evening earlier as it needs to stiffen in the fridge for a good few hours.
  • Please note that You need to use 16cm springform cake pan, unless the cake will be destroyed.
  • Make sure your springform pan is perfectly clean and do not use baking paper, as it will stick to the raspberry foam, get moist and after all, you'd end up with another cake layer, made of baking paper.


Ingredients:

  • 200 g of Savoiardi/ladyfingers (around the cake)
  • red, forest fruit (top)

Raspberry mousse (bottom):

  • 350g of raspberries (fresh or frozen - if so, defrost)
  • lemon juice from 1/2 of lemon
  • 1/3 glass of sugar
  • 2,5 teaspoon of powdered gelatin
  • 200ml of 36% cream, cool
Raspberry cream:
  • 250g of mascarpone cheese, cool 
  • 150ml of 36% cream, cool
  • 3 tablespoons of powdered sugar
  • 1,5 teaspoon of powdered gelatin + 30ml of hot milk
  • 150g of raspberries (fresh or frozen - if so, defrost)

Preparation:

Raspberry mousse:
  • Take a pot, put raspberries, lemon juice and sugar inside. Bring to boil, stiring from time to time.
  • Sieve, to get a mousse without small seeds. 
  • Dissolve gelatin in a small amount (a tiny little bit, just to cover the gelatin) of boiling water, stir so that it melts completely. 
  • Bring the mousse to boil again and add previously prepared gelatin. Stir precisely. Set aside, it needs to cool down completely.
When cooled down:
  1. Prepare a clean springform cake pan and keep it handy.
  2. Beat 36% cream for around 5-7 minutes with a mixer (till the whipped cream is stiff). Stop mixing and slowly, spoon after spoon, add cooled down mousse. Stir gently, till it all links.
  3. Pour the mousse to the springform. Cover for with foil and put in the fridge to let it stiffen for few hours.
When ready, prepare raspberry cream::
  1. Take a small bowl/pot, put 30ml of milk inside, heat till hot. Add 1,5 teaspoon of powdered gelatin and stir till it melts completely. Set aside so that it cools down.
  2. Take another bowl suitable for mixing and put mascarpone, 36% cream and powdered sugar inside. Beat till stiff. Add raspberries and cooled down gelatin(melted in milk). Mix till everything links.
  3. Put on the top of the cake, distribute equally all over. 
  4. Cool down in the fridge for another few hours.
Finishing:
  1. When stiff, take out from the fridge. Using a knife, cut the cake around, very close to the sides of the springform, to make taking it out from the springform easier. 
  2. Take ladyfingers, stick them around the cake (the mousse is sticky, ladyfingers will stick easily).
  3. Take a ribbon, decorate the cake with it, tying it around the cake.
  4. Decorate the top of the cake with (preferably) forest fruit.
  5. Store in the fridge.
  6. Bon Appetit! :)

Tuesday, 26 August 2014

Chicken Soup

Best of all! Why? Explanation in 2 words - 'Mum's kitchen' ;) It is even said that this is the first and sometimes the only soup that children like ;) It is very easy to prepare, very tasty and healthy (it helps to cure for instance cold and flu ;) )!
Chicken soup became our traditional meal :) We eat it every Sunday :) I do recommend!
P.S. It is not a spider on the spoon, it is a lamp on the ceiling ;)


Ingredients:

  • 2kg fresh chicken
  • 1 package of filini pasta 
vegs:
  • 3 big carrots
  • 1-2 parsley(s) (without leaves)
  • 1/3-1/2 celery
  • 1 leek
spices:
  • some lovage leaves
  • 1/2 teaspoon of vegeta (or more if preferred)
  • 1/2 tablespoon of sea salt
  • 2-3 allspice grains
  • 2-3 pepper grains
  • 1-2 bay leaves

Optionally:
  • Chicken soup cube (like Knorr's)
  • Maggi

Preparation:
  1. Wash the chicken, cut out all the fat, tripe, etc. and throw it away. 
  2. Using a big knife, cut the chicken into 2 pieces (or smaller if preferred, it will shorten the time of preparation).
  3. Take a big pot, put chicken inside and fill completely with water. 
  4. Add pinch of salt and start boiling (the entire boiling will take around 1,5 hour).*
  5. During that time, prepare all the vegs - wash, peel and chop them if necessary.
  6. At some point a ,,weird" foam will start appearing on the top of the water. Using a spoon, take it out and throw away.
  7. When the foam stops appearing, add spices.
  8. After at least 45 minutes of boiling, add vegetables and continue boiling. 
  9. In the meantime prepare the pasta, as the instruction on the packaging says. When done, put in a colander and pour cold water on it (it will prevent the pasta from being too sticky).
  10. It is good to check if the chicken is ready - take it out from the soup, put on a big place and cut into smaller pieces, checking if it isn't raw inside (put it back in the soup).
  11. When done, serve with pasta, carrot pieces and parsley leaves.
  12. Bon Appetit! :)

Here - optionally and especially if the chicken isn't wonderfully fresh - you can put the chicken in a pot with water, add salt (1/2-1 teaspoon) and leave it for around an hour. After that time, change the water completely, add some salt again and continue preparing the soup as the following steps say.

Sunday, 13 July 2014

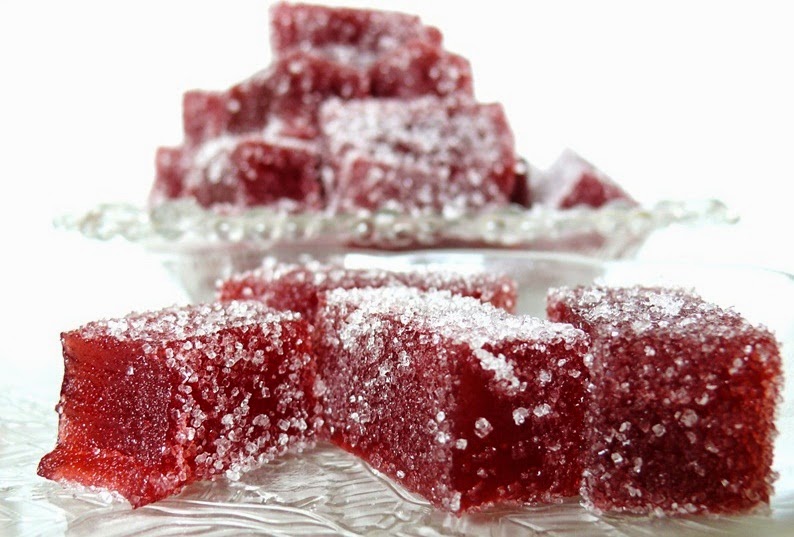
Fruit Jellies

Very tasty, fruity, healthy, natural jellies, possible to be prepared from many different fruit, especially, if you have no idea, what to do with them or when they are...way too ripe ;) 
Lack of artificial substances is undoubtedly their biggest advantage.
They might be sprinkled with sugar (though I prefer sugar-free jellies :) ). It is a quick, light and delicious form of confectionery. My little naphew's face and hands are all in strawberry jelly now, so I guess they're tasty, hi hi ;)
Recipe comes from this website.


Ingredients:
  • 30 g of gelatin
  • 1 glass of water
  • 1-2 glasses of sugar (it depends how sweet you want your fruit puree to be)
  • 1 teaspoon of lemon juice
  • 500-600 g of fruit (either frozen or fresh - preferably: strawberries, raspberries, blueberries, currants, cherries)*

* I mixed blueberries with strawberries, which is why they are so dark.


Optional ingredients:
  • sugar or powdered sugar - to sprinkle the jellies

Preparation:
  1. Take a bigger, clean pot and put the fruit inside. Boil for 15 minutes. Grate through the sieve, to seperate puree and kernels. 
  2. Take only 3/4 glass of the mousse** to prepare jellies. Put the glass with mousse aside.
  3. Take another pot, put gelatin inside and pour the water. Wait for 4 minutes. Heat, till all the gelatin melts (stir). Add 1-2 glasses of sugar, boil and  stir till the sugar melts. Add lemon juice. 
  4. Boil for around 10 minutes on a very low heat. Turn off the heat and leave the mixture for 5 minutes. Take away the foam if any appears.
  5. Mix with fruit mousse.
  6. Take a flat form, cover with cling film or foil. Pour the mixture inside. Put it in the fridge for around 12 hours, or till the jelly stiffens.
  7. After that time, take it out of the form and cut it in any shape you like - you can use only a knife to make small squares or cookie cutters to make shapes.
  8. Sprinkle with sugar/powdered sugar - preferably only those you want to eat now.
  9. Jellies can remain (in a closed box) in the fridge for max. 2 weeks. 
  10. Bon appetit! :)

Wednesday, 2 July 2014

Strawberry Yoghurt Cake

I was looking for a nice strawberry cake recipe. But not the strawberry cake I’ve already made, ahh, I craved for something new, as I’m addicted to trying new recipes. And I found this strawberry yoghurt cake. One word: Wow! That’s the quickest and the one of the cheapest cake I’ve ever made! And I needed to bake 2 pans, one after another, day after day, cause it disappeared so quickly! I’m utterly shocked! And how many variations this one particular cake has, that’s unbelievable! Delicate, spongy, sweet, perfect for a morning coffee and for a nice lunch at work ;-) What’s more, that’s one of the ‘light’ cakes, so we can feel excused for eating half of the baking pan ;) (giggle) 
I do recommend!
The only thing that I found particularly difficult to explain to You is a polish dessert - powdered, quick, jelly-like, fruit-flavoured 'kisiel'. I can't find an equivalent for it in English. I do encourage You to look up for it. Wikipedia defines it as 'kissel' and explains a little bit what it is. If You are unable to buy it, You can easily use jam ;)
I made quite a lot of changes, though still - big thanks for KwestiaSmaku for the recipe!

Ingredients:

1 glass = 250ml
  • 2 big eggs
  • 1 glass of greek yoghurt
  • 2 glasses of flour
  • 2 teaspoons of baking powder
  • 500g of strawberries
  • ¾ -1 glass of sugar
  • 2 tablespoons of vanilla sugar
  • 25g of melted butter (or 25g of oil)
  • 1 powdered strawberry kissel
  • 2-3 tablespoons of strawberry jam


Optional ingredients:
  • Powdered sugar
  • X g of any other berries ;) (I had one bowl of currants from my garden, so I used them J)
  • Icing sugar


Preparation:
  1. Bring eggs and yoghurt to room temperature.
  2. Prepare 3 bowls. Mix flour with baking powder very precisely and sieve to the 1st bowl. Put aside.
  3. Wash your fruit. Take 500g of strawberries, cut out the leaves, divide into halves (250g each), put in remaining 2 bowls. Cut the strawberries into halves (if the strawberry is really big – 3 pieces)
  4. Take a mixer’s bowl. Put sugar and vanilla sugar inside.
  5. Melt the butter in a small pot.
  6. Take a rectangular baking pan (preferably 20x30 cm, might be a little bit bigger), grease it precisely with soft butter. Put aside.
  7. Start preheating the oven to 165C.
  8. Prepare the kissel as the recipe on the packaging says. Mix with jam. Mix 1/3 of this kissel-jam mixture with one strawberry bowl. Put aside.
  9. Add eggs to the mixer’s bowl with sugars.
  10. Using a mixer, start beating for 7 minutes. After that time, put the mixer aside, add yoghurt, melted butter, sieved flour with baking powder and slowly, precisely, for a short time, stir, using a big spoon or spatula, only till all the ingredients link, not longer.
  11. Put the dough in previously prepared greased baking pan, distribute the dough all over the pan.
  12. Take a bowl with kissel strawberries. Here – preferably – don’t use much of the kissel as it may destroy the cake, it is perfectly enough if there is some kissel on the strawberry. Put the strawberries all over the cake, leaving some space between them (chequered pattern works and looks perfectly).
  13. When done, put it in the oven and bake for 20 minutes. Observe your cake, it might take less or more time for Your cake to be ready, as every oven works differently – You are probably the person who knows it best.
  14. After those 20 minutes, if the top is gold, use a toothpick to check, if it is ready inside. If not – cover the top with foil and bake for another 10 minutes or so.*
  15. Cool down, take out from the pan. Take the second bowl with strawberries and kissel, fill the holes in the cake - firstly with some kissel, then with a strawberry.
  16. Sprinkle the cake with (for instance) remaining fruit (or any other additional fruit if You have prepared them), powdered sugar, icing sugar or add remaining kissel all over the cake.
  17. Bon Appetit! ;)


*the cake should be much bigger, its sides should stick out from the pan, the top should be gold and a toothpick clean (if there is any cake glued to a toothpick, it is not ready yet)


Thursday, 14 November 2013

Sweet Semolina

Sweet semolina could be the second name of (dessert) simplicity. This timeless and delightful dessert will always satisfy both children and adult's palates :) Honestly, there is no sophisticated recipe, if you have never tried it, this is a must-try!
Recipe from... genes? I have no idea... :) it's like preparing cornflakes for breakfast :)

Ingredients:

  • 800ml of milk
  • 110g of semolina(or farina, or grit)
Additionals:
  • caramelized apples*
  • cheery (or other) jam
  • almonds
  • .... :)

Preparation:
  1. Prepare around 6 dessert bowls.
  2. Take a clean pot, put all the milk inside, start heating on a low heat, not to burn the milk.
  3. When milk starts boiling, gradually start adding the semolina, stiring energetically all the time, to avoid lumps.
  4. Boil for around 2-3 more minutes, then distribute prepared grit to all the dessert bowls. 
  5. Put chosen additionals on the top of every dessert bowl.
  6. Bon Appetit!

*How to prepare caramelized apples?

Ingredients:
  • 3-4 apples (usually 1 apple per 1 person is enough)
  • 2 tablespoons of water
  • 1-2 tablespoons of brown sugar
  • 1-2 teaspoons of cinnamon

Preparation:
  1. Wash the apples, peel and cut into wedges.
  2. Take a pot, put water and apples inside, start heating.
  3. After 3-5 minutes add sugar and cinnamon. Stir from time to time.
  4. Boil for another 5 minutes.* Turn off the heat.
  5. Bon Appetit! :)
* The longer the apples are boiling the softer they become and they start falling into very small pieces.