Showing posts with label forest fruit. Show all posts

Friday, 29 August 2014

Raspberry Charlotte Cake

This perfect cake has only perfect advantages :) perfectly literally! :) It is perfect for a gift, it looks gorgeous, tastes wonderfully, it is extremely easy to make and doesn't require using an oven :)
The recipe, slightly changed, comes from this website.


Notes:

  • Prepare this cake at least an evening earlier as it needs to stiffen in the fridge for a good few hours.
  • Please note that You need to use 16cm springform cake pan, unless the cake will be destroyed.
  • Make sure your springform pan is perfectly clean and do not use baking paper, as it will stick to the raspberry foam, get moist and after all, you'd end up with another cake layer, made of baking paper.


Ingredients:

  • 200 g of Savoiardi/ladyfingers (around the cake)
  • red, forest fruit (top)

Raspberry mousse (bottom):

  • 350g of raspberries (fresh or frozen - if so, defrost)
  • lemon juice from 1/2 of lemon
  • 1/3 glass of sugar
  • 2,5 teaspoon of powdered gelatin
  • 200ml of 36% cream, cool
Raspberry cream:
  • 250g of mascarpone cheese, cool 
  • 150ml of 36% cream, cool
  • 3 tablespoons of powdered sugar
  • 1,5 teaspoon of powdered gelatin + 30ml of hot milk
  • 150g of raspberries (fresh or frozen - if so, defrost)

Preparation:

Raspberry mousse:
  • Take a pot, put raspberries, lemon juice and sugar inside. Bring to boil, stiring from time to time.
  • Sieve, to get a mousse without small seeds. 
  • Dissolve gelatin in a small amount (a tiny little bit, just to cover the gelatin) of boiling water, stir so that it melts completely. 
  • Bring the mousse to boil again and add previously prepared gelatin. Stir precisely. Set aside, it needs to cool down completely.
When cooled down:
  1. Prepare a clean springform cake pan and keep it handy.
  2. Beat 36% cream for around 5-7 minutes with a mixer (till the whipped cream is stiff). Stop mixing and slowly, spoon after spoon, add cooled down mousse. Stir gently, till it all links.
  3. Pour the mousse to the springform. Cover for with foil and put in the fridge to let it stiffen for few hours.
When ready, prepare raspberry cream::
  1. Take a small bowl/pot, put 30ml of milk inside, heat till hot. Add 1,5 teaspoon of powdered gelatin and stir till it melts completely. Set aside so that it cools down.
  2. Take another bowl suitable for mixing and put mascarpone, 36% cream and powdered sugar inside. Beat till stiff. Add raspberries and cooled down gelatin(melted in milk). Mix till everything links.
  3. Put on the top of the cake, distribute equally all over. 
  4. Cool down in the fridge for another few hours.
Finishing:
  1. When stiff, take out from the fridge. Using a knife, cut the cake around, very close to the sides of the springform, to make taking it out from the springform easier. 
  2. Take ladyfingers, stick them around the cake (the mousse is sticky, ladyfingers will stick easily).
  3. Take a ribbon, decorate the cake with it, tying it around the cake.
  4. Decorate the top of the cake with (preferably) forest fruit.
  5. Store in the fridge.
  6. Bon Appetit! :)

Sunday, 17 August 2014

Raspberry Buns

Absolutely stunning! Best buns I've ever eaten! Soft, moist, sweet raspberries plus mascarpone cheese make a wonderful couple if it comes to the taste and the overall effect is outrageous :) Perfect for breakfast, lunch, either at home or at work/school. A definite must-bake :) A big thanks to Deliciouslyyum for the recipe!
If You need a converter, feel free to use this one.


Ingredients:


Dough:

  • 1 cup of milk
  • 4 tablespoons of butter, cut into small pieces
  • 3 1/4 – 3 1/2 cups of flour, divided
  • 1 package of instant yeast (about 2 1/4 teaspoons)
  • 1/4 cup of white sugar
  • 1/2 teaspoon of salt
  • 1 egg

Filling:

  • 8 oz. of mascarpone cheese, at room temperature
  • 5 tablespoons of granulated sugar, divided
  • 1 teaspoon of vanilla extract
  • 12 oz. of raspberries (if frozen, need to be defrost and dried on a paper towel)
  • 1 tablespoon of cornstarch
  • zest of 1 lemon

Icing:
  • 1 and 1/2 cups of confectioners’ sugar
  • 2 tablespoons of melted butter
  • 1/2 teaspoon of vanilla
  • 1-2 tablespoons of milk


Preparation:


Dough:

  1. Take a baking tray, grease and put baking paper all over it. Set aside.
  2. Take a bowl (suitable to put in a microwave or on the stove), put milk and butter inside and heat till the butter is almost melted and the milk is warm. Stir till the butter is completely melted. Set aside. 
  3. Take a big bowl (you can do it using a stand mixer if it is suitable to knead the dough), put 2 cups of flour, yeast, sugar, and salt inside. Stir, so that it mixes.
  4. Add the egg and milk to the dry mix and continue stirring until thoroughly combined. Start kneading for at least few minutes (till the douhg starts pulling away from the sides) and add remaining flour. 
  5. Knead the dough for another 5 minutes. 
  6. Cover the bowl with dough with a dry, clean cloth and put in a warm place (do not leave it near an open window, even if it is hot outside). Leave it for at least 10 minutes or until it doubles its size.
  7. During that time, prepare the filling.

Filling&Dough:

  1. Take a bowl, put mascarpone cheese, 3 tablespoons of sugar and vanilla extract inside. Set aside.
  2. Take another bowl, put frozen raspberries, remaining 2 tablespoons of sugar and cornstarch inside, mix. Set aside as well.
  1. When the dough is ready, sprinkle kitchen's surface with flour and roll it out until you get a 12 x 14 inches rectangle. 
  2. Distribute mascarpone cheese mixture evenly over the dough. Put raspberry mixture on top and sprinkle with lemon zest. 
  3. Now, time to roll the dough up - starting with one of the longer's side, roll the dough into a log. Close the sides very precisely so that the filling doesn't come out. 
  4. Cut into slices (around 2-3 cm thick) and put them on previously prepared baking tray, leaving some space between them (the buns will rise again). Cover again with a clean kitchen cloth. Set aside in a warm place for at least 30 minutes (or till it doubles its size again). 
  5. During that time, start preheating the oven to 180C. 
  6. Bake the buns for around 20 minutes (or until the tops are golden brown).
  7. Now, it is a good time, to prepare the icing.
Icing:
  1. Mix confectioners’ sugar, butter, vanilla and milk. 
  2. When the buns are ready, take them out from the oven, let them cool down for a while and distribute the icing all over their tops.
  3. Keep closed for max 3 days or store closed in the freezer for maximum 3 weeks.
  4. Bon Appetit! ;)

Monday, 21 July 2014

Cherry Éclairs


Uhh, at first they seem so quick and easy, but the filling and final preparing them was more of a challenge :) However, the final outcome is really wonderful :) I gave a good plate for my brother, but before he reached his house, the plate was already empty ;) 
It would be a sin, not to recommend them ;)
This recipe is a mix of recipes from those two pages.


Ingredients:

Éclairs dough:
  • 250 ml of water
  • 125g of butter or margarine
  • 1 glass of flour
  • 4 eggs
  • a pinch of salt

Filling:
  • 200 ml of milk
  • 300g of cherries (fresh or frozen)
  • 3 egg yolks
  • 20g of flour
  • 20g of potato starch
  • 90g of sugar
  • 1 packaging of vanilla sugar
  • 1 tablespoon of butter

Icing:
  • 1 glass of powdered sugar
  • 4-5 tablespoons of water

Optional icing ingredients:
  • flavoured extract - vanilla, almond, lemon, etc.
  • food colouring
  • or - instead of icing - ganache, chocolate frosting

Optional ingredients - decoration:
  • cherry (or any other flavour - different fruit, caramel, chocolate, coffee, nut...) mousse
  • whipped cream
  • fruit
  • nuts
  • mincemeat

Preparation - dough:
  1. Take a baking tray, grease and put baking paper on it. Put aside.
  2. Take a pot, put water, butter and salt inside, boil.
  3. When brought to boil, add flour and stir energetically (to prevent the bottom from burning). The dough should be smooth and should not stick to the pot.
  4. Put aside, to let it cool down completely.
  5. When cooled down, mix the dough with eggs, for a quite long time, till smooth.* 
  6. Put the dough inside a syringe or a piping pastry bag with a steel piping nozzle (preferably quite big star shape).
  7. Distribute long pieces of cake, leaving some space between them, as they will grow quite much.
  8. Bake in the oven for 25-35 minutes, on 200C. Make sure they're ready inside.
  9. When baked, cool down and cut lengthways.
* Longer mixing helps it grow up in the oven later on, as there is no baking powder.


Preparation - filling:
  1. If your cherries are frozen - defrost, make sure there are no kernels, pour away the water.
  2. If fresh - throw away the kernels.
  3. Put the cherries in a bowl. Mix, with a mixer, till smooth, to get a mousse. If there's cherry juice, pour it away, for a different use.
  4. Take a pot, pour milk and add cherry mousse inside. Start boiling. When brought to boil, turn off the heat and put aside to let it cool down.
  5. Take a mixer and its bowl, beat the eggs with sugar and vanilla sugar. Add flour and potato starch. Using a spatula, mix precisely.
  6. Gradually add cherry milk mixture to the mixer's bowl, stiring precisely.
  7. Put the mixture back in the pot and start boiling. Stir all the time, as it will thicken, like a custard, quite fast. Be careful not to burn the bottom.
  8. When thick and ready, add butter and stir, to let the butter melt. Cover with foil and put aside, to let it cool down. Later on, when cool, keep in the fridge (it will thicken more), till you need it.

Preparation - icing sugar:
  1. Put all the ingredients together and stir to get a desired consistency of the icing (needs to be thick). 

Finishing:
  1. Prepare a baking grill or another baking tray, cover with baking paper, put aside.
  2. Take the top pieces of your Éclairs and dip in previously prepared icing. 
  3. Transfer them into steel baking grill or baking tray and leave for a while in the fridge.
  4. Put the cherry filling inside a syringe or a piping pastry bag with a steel piping nozzle (preferably quite big star shape) and distribute it on the bottom piece of your Éclair in any way desired. You can add fruit, whipped cream or use only the cherry filling.
  5. Cover with the suitable top piece covered with icing.
  6. Store in the fridge.
  7. Bon Appetit! :)

Sunday, 13 July 2014

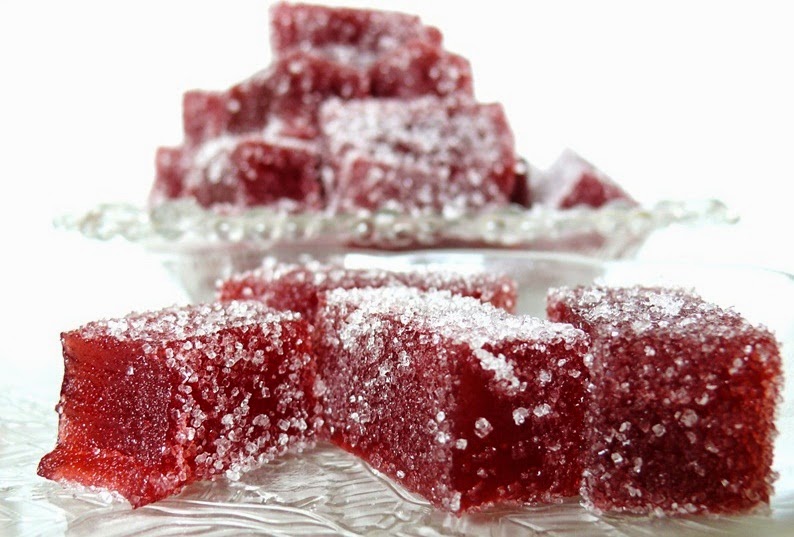
Fruit Jellies

Very tasty, fruity, healthy, natural jellies, possible to be prepared from many different fruit, especially, if you have no idea, what to do with them or when they are...way too ripe ;) 
Lack of artificial substances is undoubtedly their biggest advantage.
They might be sprinkled with sugar (though I prefer sugar-free jellies :) ). It is a quick, light and delicious form of confectionery. My little naphew's face and hands are all in strawberry jelly now, so I guess they're tasty, hi hi ;)
Recipe comes from this website.


Ingredients:
  • 30 g of gelatin
  • 1 glass of water
  • 1-2 glasses of sugar (it depends how sweet you want your fruit puree to be)
  • 1 teaspoon of lemon juice
  • 500-600 g of fruit (either frozen or fresh - preferably: strawberries, raspberries, blueberries, currants, cherries)*

* I mixed blueberries with strawberries, which is why they are so dark.


Optional ingredients:
  • sugar or powdered sugar - to sprinkle the jellies

Preparation:
  1. Take a bigger, clean pot and put the fruit inside. Boil for 15 minutes. Grate through the sieve, to seperate puree and kernels. 
  2. Take only 3/4 glass of the mousse** to prepare jellies. Put the glass with mousse aside.
  3. Take another pot, put gelatin inside and pour the water. Wait for 4 minutes. Heat, till all the gelatin melts (stir). Add 1-2 glasses of sugar, boil and  stir till the sugar melts. Add lemon juice. 
  4. Boil for around 10 minutes on a very low heat. Turn off the heat and leave the mixture for 5 minutes. Take away the foam if any appears.
  5. Mix with fruit mousse.
  6. Take a flat form, cover with cling film or foil. Pour the mixture inside. Put it in the fridge for around 12 hours, or till the jelly stiffens.
  7. After that time, take it out of the form and cut it in any shape you like - you can use only a knife to make small squares or cookie cutters to make shapes.
  8. Sprinkle with sugar/powdered sugar - preferably only those you want to eat now.
  9. Jellies can remain (in a closed box) in the fridge for max. 2 weeks. 
  10. Bon appetit! :)

Wednesday, 2 July 2014

Strawberry Yoghurt Cake

I was looking for a nice strawberry cake recipe. But not the strawberry cake I’ve already made, ahh, I craved for something new, as I’m addicted to trying new recipes. And I found this strawberry yoghurt cake. One word: Wow! That’s the quickest and the one of the cheapest cake I’ve ever made! And I needed to bake 2 pans, one after another, day after day, cause it disappeared so quickly! I’m utterly shocked! And how many variations this one particular cake has, that’s unbelievable! Delicate, spongy, sweet, perfect for a morning coffee and for a nice lunch at work ;-) What’s more, that’s one of the ‘light’ cakes, so we can feel excused for eating half of the baking pan ;) (giggle) 
I do recommend!
The only thing that I found particularly difficult to explain to You is a polish dessert - powdered, quick, jelly-like, fruit-flavoured 'kisiel'. I can't find an equivalent for it in English. I do encourage You to look up for it. Wikipedia defines it as 'kissel' and explains a little bit what it is. If You are unable to buy it, You can easily use jam ;)
I made quite a lot of changes, though still - big thanks for KwestiaSmaku for the recipe!

Ingredients:

1 glass = 250ml
  • 2 big eggs
  • 1 glass of greek yoghurt
  • 2 glasses of flour
  • 2 teaspoons of baking powder
  • 500g of strawberries
  • ¾ -1 glass of sugar
  • 2 tablespoons of vanilla sugar
  • 25g of melted butter (or 25g of oil)
  • 1 powdered strawberry kissel
  • 2-3 tablespoons of strawberry jam


Optional ingredients:
  • Powdered sugar
  • X g of any other berries ;) (I had one bowl of currants from my garden, so I used them J)
  • Icing sugar


Preparation:
  1. Bring eggs and yoghurt to room temperature.
  2. Prepare 3 bowls. Mix flour with baking powder very precisely and sieve to the 1st bowl. Put aside.
  3. Wash your fruit. Take 500g of strawberries, cut out the leaves, divide into halves (250g each), put in remaining 2 bowls. Cut the strawberries into halves (if the strawberry is really big – 3 pieces)
  4. Take a mixer’s bowl. Put sugar and vanilla sugar inside.
  5. Melt the butter in a small pot.
  6. Take a rectangular baking pan (preferably 20x30 cm, might be a little bit bigger), grease it precisely with soft butter. Put aside.
  7. Start preheating the oven to 165C.
  8. Prepare the kissel as the recipe on the packaging says. Mix with jam. Mix 1/3 of this kissel-jam mixture with one strawberry bowl. Put aside.
  9. Add eggs to the mixer’s bowl with sugars.
  10. Using a mixer, start beating for 7 minutes. After that time, put the mixer aside, add yoghurt, melted butter, sieved flour with baking powder and slowly, precisely, for a short time, stir, using a big spoon or spatula, only till all the ingredients link, not longer.
  11. Put the dough in previously prepared greased baking pan, distribute the dough all over the pan.
  12. Take a bowl with kissel strawberries. Here – preferably – don’t use much of the kissel as it may destroy the cake, it is perfectly enough if there is some kissel on the strawberry. Put the strawberries all over the cake, leaving some space between them (chequered pattern works and looks perfectly).
  13. When done, put it in the oven and bake for 20 minutes. Observe your cake, it might take less or more time for Your cake to be ready, as every oven works differently – You are probably the person who knows it best.
  14. After those 20 minutes, if the top is gold, use a toothpick to check, if it is ready inside. If not – cover the top with foil and bake for another 10 minutes or so.*
  15. Cool down, take out from the pan. Take the second bowl with strawberries and kissel, fill the holes in the cake - firstly with some kissel, then with a strawberry.
  16. Sprinkle the cake with (for instance) remaining fruit (or any other additional fruit if You have prepared them), powdered sugar, icing sugar or add remaining kissel all over the cake.
  17. Bon Appetit! ;)


*the cake should be much bigger, its sides should stick out from the pan, the top should be gold and a toothpick clean (if there is any cake glued to a toothpick, it is not ready yet)


Monday, 19 August 2013

'Everyberry' crumble cake with custard foam

Why everyberry? Because it is possible to add many different fruit - strawberries, raspberries, blueberries... or event currants :) It is possible to make it from one kind of fruits or to mix some of them. It is absolutely a wonderful cake. During this year's summer holidays I made it a couple of times! I do recommend preparing it with double foam (I will write below how to bake it, because it differs from the basic version).
A must-do!


Ingredients for the dough:
  • 2,5 glasses of flour
  • 250 g of cold butter or margarine 
  • 2 teaspoons of baking powder
  • 3 tablespoons of powdered sugar
  • 5 egg yolks (do not throw away the whites, they are necessary to make the foam! Put them aside.)

Ingredients for the foam:*

  • 5 egg whites
  • 1 glass of sugar
  • 1 packaging of vanilla sugar (16g)
  • 2 packagings (40 g each) of powdered vanilla/cream custard (budyń, budyń again!) 
  • 1/2 glass of oil

* I do recommend making double foam - if so, just double every ingredient - 10 egg whites (but the bottom of the cake, the dough, takes only 5 yolks, it doesn't change!) 2 glasses of sugar, etc. Then, we bake the bottom as the basic recipe says, but the second baking will take around 30-40 minutes in 170-180C.


Additional ingredients - the top:

  • 500-600 g of fruit (for example 200 g of raspberries, 200 g of blueberries, 200 g of currants)
  • powdered sugar, to sprinkle the top


Preparation:
  1. Take a big bowl. Put the flour, baking powder, powdered sugar and egg yolks inside. Chop the butter and add it to that bowl as well. Knead it quickly. Divide the dough into 2 spheres - one 60% of the dough and another 40%. Twist every piece around a cling film and put inside the freezer for an hour or 2. (It is possible to prepare the dough one day earlier).
  2. Take a rectangular pan. Grease it and put baking paper all over the pan. 
  3. Take the bigger sphere from the freezer and grate it on the entire bottom of the pan(the smaller one remains in the freezer). Bake it in 190C for around 20minutes (till it gets a light-gold colour). Cool down.
  4. While the cake is cooling down, wash all the fruit and put them on paper towels, to let them dry.
  5. When the bottom of the cake is cooled down, start preparing the foam.
  6. Take a big bowl, put egg whites inside. Beat till stiff (around 7-9 minutes). One tablespoon after another, add sugar and vanilla sugar, still mixing. Without stopping the mixer, add powdered custard and slowly, the oil.
  7. Put the foam on a cooled down bottom of the cake. 
  8. Put all the fruit on the foam.
  9. Take the second sphere and grate it on the top of the cake.
  10. Bake in 190C for 30-40 minutes.
  11. Cool down, sprinkle with powdered sugar.
  12. Bon, bon Appetit! :)

Monday, 29 July 2013

Muffin cake with seasonal fruit and meringue


There is one, particular muffin recipe that I do love. The dough is soft, fluffy, it melts in your mouth. And I thought about a cake made of that recipe, with seasonal fruit... and some my private topping ideas...and it appeared to be delicious :) worth trying :) 


Ingredients:

  • 300 g of butter
  • 2 glasses of sugar
  • 1 glass + 2 tablespoons of potato flour
  • 4 teaspoons of vanilla extract
  • 6 small eggs or 4 big ones
  • a pinch of salt
  • 1 tablespoon of water
  • 3/4 glass of flour
  • 1 teaspoon of baking powder
  • fruit - blueberries, strawberries, raspberries, etc

Top:

  • 2 packagings of budyn (or 2x ingredients from this recipe)
  • 2 teaspoons of lemon juice
  • 1-2 packaging(s) of ready-made meringue (of course you can use your own, home made if you wish)

Preparation:


Base, the dough:
  1. Take a bigger pot. Cutting butter into smaller pieces, put it inside. Melt on a low heat (2-4 minutes or shorter if it starts burning). 
  2. Take it out of the stove. Add sugar, potato flour, vanilla extract, a pinch of salt and 1 tablespoon of water. Stir quickly to make it link. Cool down.
  3. Add eggs - one after another, stiring after every egg. Add flour, baking powder, stir.
  4. Take a rectangular pan, put the dough inside, distribute all over the form.
  5. Add fruit - all over the cake.
  6. Put in the oven for around 30-45 minutes on 150-170C, till it gets golden colour. (I set 160C).*! Check, using a toothpick, if the cake is ready.
  7. When done, cool down.
Top:
  1. Prepare 2 ' budyń ' as the packagings (or recipe - double it) says. When ready, add 2 teaspoons of lemon juice, stir. Pour it on the cake, distribute all over the cake.
  2. Sprinkle with meringue (try to choose meringue that has no additional flavour)
  3. Sprinkle with fruit.
  4. Keep in the fridge.
  5. Bon Appetit ! :)

*Keep looking - every oven works differently (mind that some ovens tend to burn some parts - for example things that are at the back of the oven) don't let it get gold too fast, because the inside will be raw.


Monday, 22 July 2013

Pineapple smoothie

Refreshing, healthy supper (or its part ;) ). Recipe is my own idea.

Ingredients(for 4 latte glasses):
  • 1/2 pineapple, peeled, chopped
  • 3-5 handfuls of cherries

Optional ingredients:
  • 1/3-1/2 glass of milk/natural yoghurt
  • sugar
  • ice cubes

Preparation:
  1. Put the pineapple in a bowl, blend till smooth. 
  2. Take cherries - if frozen - defrost in a pot by heating them. 
  3. Mash the cherries, to get cherry mousse with no skins (make sure there are no kernels).
  4. Add cherries to blended pineapple. Blend till smooth.
  5. Add sugar, milk and ice cubes. (step by step, tasting, to make it suitable for you)
  6. Bon Appetit! :)