Showing posts with label currants. Show all posts

Friday, 29 August 2014

Raspberry Charlotte Cake

This perfect cake has only perfect advantages :) perfectly literally! :) It is perfect for a gift, it looks gorgeous, tastes wonderfully, it is extremely easy to make and doesn't require using an oven :)
The recipe, slightly changed, comes from this website.


Notes:

  • Prepare this cake at least an evening earlier as it needs to stiffen in the fridge for a good few hours.
  • Please note that You need to use 16cm springform cake pan, unless the cake will be destroyed.
  • Make sure your springform pan is perfectly clean and do not use baking paper, as it will stick to the raspberry foam, get moist and after all, you'd end up with another cake layer, made of baking paper.


Ingredients:

  • 200 g of Savoiardi/ladyfingers (around the cake)
  • red, forest fruit (top)

Raspberry mousse (bottom):

  • 350g of raspberries (fresh or frozen - if so, defrost)
  • lemon juice from 1/2 of lemon
  • 1/3 glass of sugar
  • 2,5 teaspoon of powdered gelatin
  • 200ml of 36% cream, cool
Raspberry cream:
  • 250g of mascarpone cheese, cool 
  • 150ml of 36% cream, cool
  • 3 tablespoons of powdered sugar
  • 1,5 teaspoon of powdered gelatin + 30ml of hot milk
  • 150g of raspberries (fresh or frozen - if so, defrost)

Preparation:

Raspberry mousse:
  • Take a pot, put raspberries, lemon juice and sugar inside. Bring to boil, stiring from time to time.
  • Sieve, to get a mousse without small seeds. 
  • Dissolve gelatin in a small amount (a tiny little bit, just to cover the gelatin) of boiling water, stir so that it melts completely. 
  • Bring the mousse to boil again and add previously prepared gelatin. Stir precisely. Set aside, it needs to cool down completely.
When cooled down:
  1. Prepare a clean springform cake pan and keep it handy.
  2. Beat 36% cream for around 5-7 minutes with a mixer (till the whipped cream is stiff). Stop mixing and slowly, spoon after spoon, add cooled down mousse. Stir gently, till it all links.
  3. Pour the mousse to the springform. Cover for with foil and put in the fridge to let it stiffen for few hours.
When ready, prepare raspberry cream::
  1. Take a small bowl/pot, put 30ml of milk inside, heat till hot. Add 1,5 teaspoon of powdered gelatin and stir till it melts completely. Set aside so that it cools down.
  2. Take another bowl suitable for mixing and put mascarpone, 36% cream and powdered sugar inside. Beat till stiff. Add raspberries and cooled down gelatin(melted in milk). Mix till everything links.
  3. Put on the top of the cake, distribute equally all over. 
  4. Cool down in the fridge for another few hours.
Finishing:
  1. When stiff, take out from the fridge. Using a knife, cut the cake around, very close to the sides of the springform, to make taking it out from the springform easier. 
  2. Take ladyfingers, stick them around the cake (the mousse is sticky, ladyfingers will stick easily).
  3. Take a ribbon, decorate the cake with it, tying it around the cake.
  4. Decorate the top of the cake with (preferably) forest fruit.
  5. Store in the fridge.
  6. Bon Appetit! :)

Sunday, 13 July 2014

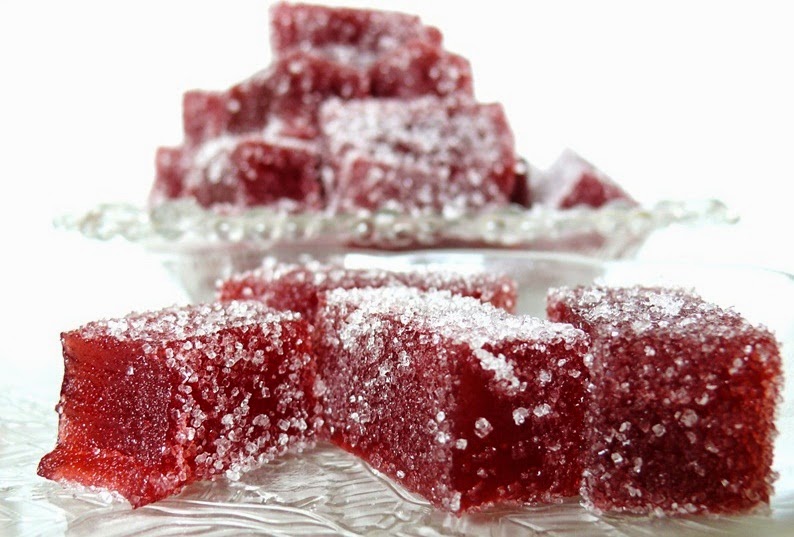
Fruit Jellies

Very tasty, fruity, healthy, natural jellies, possible to be prepared from many different fruit, especially, if you have no idea, what to do with them or when they are...way too ripe ;) 
Lack of artificial substances is undoubtedly their biggest advantage.
They might be sprinkled with sugar (though I prefer sugar-free jellies :) ). It is a quick, light and delicious form of confectionery. My little naphew's face and hands are all in strawberry jelly now, so I guess they're tasty, hi hi ;)
Recipe comes from this website.


Ingredients:
  • 30 g of gelatin
  • 1 glass of water
  • 1-2 glasses of sugar (it depends how sweet you want your fruit puree to be)
  • 1 teaspoon of lemon juice
  • 500-600 g of fruit (either frozen or fresh - preferably: strawberries, raspberries, blueberries, currants, cherries)*

* I mixed blueberries with strawberries, which is why they are so dark.


Optional ingredients:
  • sugar or powdered sugar - to sprinkle the jellies

Preparation:
  1. Take a bigger, clean pot and put the fruit inside. Boil for 15 minutes. Grate through the sieve, to seperate puree and kernels. 
  2. Take only 3/4 glass of the mousse** to prepare jellies. Put the glass with mousse aside.
  3. Take another pot, put gelatin inside and pour the water. Wait for 4 minutes. Heat, till all the gelatin melts (stir). Add 1-2 glasses of sugar, boil and  stir till the sugar melts. Add lemon juice. 
  4. Boil for around 10 minutes on a very low heat. Turn off the heat and leave the mixture for 5 minutes. Take away the foam if any appears.
  5. Mix with fruit mousse.
  6. Take a flat form, cover with cling film or foil. Pour the mixture inside. Put it in the fridge for around 12 hours, or till the jelly stiffens.
  7. After that time, take it out of the form and cut it in any shape you like - you can use only a knife to make small squares or cookie cutters to make shapes.
  8. Sprinkle with sugar/powdered sugar - preferably only those you want to eat now.
  9. Jellies can remain (in a closed box) in the fridge for max. 2 weeks. 
  10. Bon appetit! :)

Wednesday, 2 July 2014

Strawberry Yoghurt Cake

I was looking for a nice strawberry cake recipe. But not the strawberry cake I’ve already made, ahh, I craved for something new, as I’m addicted to trying new recipes. And I found this strawberry yoghurt cake. One word: Wow! That’s the quickest and the one of the cheapest cake I’ve ever made! And I needed to bake 2 pans, one after another, day after day, cause it disappeared so quickly! I’m utterly shocked! And how many variations this one particular cake has, that’s unbelievable! Delicate, spongy, sweet, perfect for a morning coffee and for a nice lunch at work ;-) What’s more, that’s one of the ‘light’ cakes, so we can feel excused for eating half of the baking pan ;) (giggle) 
I do recommend!
The only thing that I found particularly difficult to explain to You is a polish dessert - powdered, quick, jelly-like, fruit-flavoured 'kisiel'. I can't find an equivalent for it in English. I do encourage You to look up for it. Wikipedia defines it as 'kissel' and explains a little bit what it is. If You are unable to buy it, You can easily use jam ;)
I made quite a lot of changes, though still - big thanks for KwestiaSmaku for the recipe!

Ingredients:

1 glass = 250ml
  • 2 big eggs
  • 1 glass of greek yoghurt
  • 2 glasses of flour
  • 2 teaspoons of baking powder
  • 500g of strawberries
  • ¾ -1 glass of sugar
  • 2 tablespoons of vanilla sugar
  • 25g of melted butter (or 25g of oil)
  • 1 powdered strawberry kissel
  • 2-3 tablespoons of strawberry jam


Optional ingredients:
  • Powdered sugar
  • X g of any other berries ;) (I had one bowl of currants from my garden, so I used them J)
  • Icing sugar


Preparation:
  1. Bring eggs and yoghurt to room temperature.
  2. Prepare 3 bowls. Mix flour with baking powder very precisely and sieve to the 1st bowl. Put aside.
  3. Wash your fruit. Take 500g of strawberries, cut out the leaves, divide into halves (250g each), put in remaining 2 bowls. Cut the strawberries into halves (if the strawberry is really big – 3 pieces)
  4. Take a mixer’s bowl. Put sugar and vanilla sugar inside.
  5. Melt the butter in a small pot.
  6. Take a rectangular baking pan (preferably 20x30 cm, might be a little bit bigger), grease it precisely with soft butter. Put aside.
  7. Start preheating the oven to 165C.
  8. Prepare the kissel as the recipe on the packaging says. Mix with jam. Mix 1/3 of this kissel-jam mixture with one strawberry bowl. Put aside.
  9. Add eggs to the mixer’s bowl with sugars.
  10. Using a mixer, start beating for 7 minutes. After that time, put the mixer aside, add yoghurt, melted butter, sieved flour with baking powder and slowly, precisely, for a short time, stir, using a big spoon or spatula, only till all the ingredients link, not longer.
  11. Put the dough in previously prepared greased baking pan, distribute the dough all over the pan.
  12. Take a bowl with kissel strawberries. Here – preferably – don’t use much of the kissel as it may destroy the cake, it is perfectly enough if there is some kissel on the strawberry. Put the strawberries all over the cake, leaving some space between them (chequered pattern works and looks perfectly).
  13. When done, put it in the oven and bake for 20 minutes. Observe your cake, it might take less or more time for Your cake to be ready, as every oven works differently – You are probably the person who knows it best.
  14. After those 20 minutes, if the top is gold, use a toothpick to check, if it is ready inside. If not – cover the top with foil and bake for another 10 minutes or so.*
  15. Cool down, take out from the pan. Take the second bowl with strawberries and kissel, fill the holes in the cake - firstly with some kissel, then with a strawberry.
  16. Sprinkle the cake with (for instance) remaining fruit (or any other additional fruit if You have prepared them), powdered sugar, icing sugar or add remaining kissel all over the cake.
  17. Bon Appetit! ;)


*the cake should be much bigger, its sides should stick out from the pan, the top should be gold and a toothpick clean (if there is any cake glued to a toothpick, it is not ready yet)


Monday, 19 August 2013

'Everyberry' crumble cake with custard foam

Why everyberry? Because it is possible to add many different fruit - strawberries, raspberries, blueberries... or event currants :) It is possible to make it from one kind of fruits or to mix some of them. It is absolutely a wonderful cake. During this year's summer holidays I made it a couple of times! I do recommend preparing it with double foam (I will write below how to bake it, because it differs from the basic version).
A must-do!


Ingredients for the dough:
  • 2,5 glasses of flour
  • 250 g of cold butter or margarine 
  • 2 teaspoons of baking powder
  • 3 tablespoons of powdered sugar
  • 5 egg yolks (do not throw away the whites, they are necessary to make the foam! Put them aside.)

Ingredients for the foam:*

  • 5 egg whites
  • 1 glass of sugar
  • 1 packaging of vanilla sugar (16g)
  • 2 packagings (40 g each) of powdered vanilla/cream custard (budyń, budyń again!) 
  • 1/2 glass of oil

* I do recommend making double foam - if so, just double every ingredient - 10 egg whites (but the bottom of the cake, the dough, takes only 5 yolks, it doesn't change!) 2 glasses of sugar, etc. Then, we bake the bottom as the basic recipe says, but the second baking will take around 30-40 minutes in 170-180C.


Additional ingredients - the top:

  • 500-600 g of fruit (for example 200 g of raspberries, 200 g of blueberries, 200 g of currants)
  • powdered sugar, to sprinkle the top


Preparation:
  1. Take a big bowl. Put the flour, baking powder, powdered sugar and egg yolks inside. Chop the butter and add it to that bowl as well. Knead it quickly. Divide the dough into 2 spheres - one 60% of the dough and another 40%. Twist every piece around a cling film and put inside the freezer for an hour or 2. (It is possible to prepare the dough one day earlier).
  2. Take a rectangular pan. Grease it and put baking paper all over the pan. 
  3. Take the bigger sphere from the freezer and grate it on the entire bottom of the pan(the smaller one remains in the freezer). Bake it in 190C for around 20minutes (till it gets a light-gold colour). Cool down.
  4. While the cake is cooling down, wash all the fruit and put them on paper towels, to let them dry.
  5. When the bottom of the cake is cooled down, start preparing the foam.
  6. Take a big bowl, put egg whites inside. Beat till stiff (around 7-9 minutes). One tablespoon after another, add sugar and vanilla sugar, still mixing. Without stopping the mixer, add powdered custard and slowly, the oil.
  7. Put the foam on a cooled down bottom of the cake. 
  8. Put all the fruit on the foam.
  9. Take the second sphere and grate it on the top of the cake.
  10. Bake in 190C for 30-40 minutes.
  11. Cool down, sprinkle with powdered sugar.
  12. Bon, bon Appetit! :)

Tuesday, 18 June 2013

Malakoff Cake

Deriving from Austria, this cake isn't as hard as it seems to be. Mostly, because it doesn't require turning on the oven even for a single second ;)
Personally, I wouldn't call it a gourmet sensation, but it is, indeed, very tasty and its appearance is impressive on the table.
The recipe comes from this website.

Ingredients:

  • 25 dag/250g of ladyfingers 

Filling: 
  • 1/2 jar of black currant/raspberry jelly 
  • 1,5 glass of milk 
  • 1 vanilla pudding 
  • 4 tablespoons of sugar 
  • 25 dag/250g of butter 
  • 3 tablespoons of powdered sugar 
  • 10 dag/100g almond flakes (the original recipe requires roasting them, but I skipped that part) 
Punch:
  • 1/2 glass of white wine 
  • 50 ml of rum 
  • 2 teaspoons of sugar 
Decoration:
  • whipped cream 
  • whatever you want - you can use ready-made chocolate decorations, chocolate biscuits, (candied) cherries, blueberries, etc
Preparation:
  1. Prepare the pudding (boil it with milk and sugar, as the  recipe on the packing says), cool it. 
  2. Take a food processor, put the butter and powdered sugar inside and mix. Without stopping add one tablespoon of pudding, then another, till you mix all the pudding with butter and powdered sugar. 
  3. Mix all the ingredients of the punch (use any container you want, even a glass)
  4. Prepare a springform pan, cover the bottom with ladyfingers (preferably only one tier). Impregnate these ladyfingers with your punch. (1-2 teaspoons of punch per 1 ladyfinger is much enough, you'll see in what way your ladyfingers will react on 1 teaspoon of the punch - be careful not to make a mush)
  5. Take the currant/raspberry jelly and using a spoon, put some spoons of the jelly on a different parts of the ladyfingers, then link so that it covers the entire surface of the cake.
  6. Take the cream, prepared in the food processor, put a thick filling of it on the jelly. Don't worry if your jelly mixes a little with the cream. It is very hard to avoid it. If the entire surface is covered with cream, sprinkle it with some almond flakes. 
  7. Repeat points 4-6(ladyfingers, jelly,cream, flakes) till all the ladyfingers are gone. (save some cream for the side of the cake)There should be 2-3 tiers. The last tier are almond flakes. 
  8. Put your cake in the fridge.
  9. When the cake (especially the cream) gets harder (after some time, 1-3 hours) take off the side and use the rest of the cream on the cake's side. Then sprinkle cake's side with almond flakes. 
  10. Decorate the top of your cake with anything you want - biscuits, chocolate decorations, whipped cream, etc
  11. Keep the cake in the fridge.
  12. Bon appetit :)