Showing posts with label jam. Show all posts

Saturday, 4 April 2015

Coffolate Shortcake

A very tasty shortcake, perfect for an Easter table. I have never tried such shortcakes, as my family was used to such Easter shortcakes (which are, indeed very tasty too), but this year I decided to try something new and I am not dissapointed. Try, try, it is worth it ! :)
Recipe, slightly changed, comes from this website.


Ingredients (for a 20x30cm baking pan):

Bottom:
  • 170g of flour
  • 80g of potato starch
  • 3 tablespoons of cocoa powder
  • 1/2 teaspoon of cinnamon
  • 50g of sugar
  • 150g of cold margarine
  • 1 egg
Top:

  • 200g of cherries
  • 25g of milk chocolate

Frosting:
  • 125ml of 36% cream
  • 1 teaspoon of instant coffee
  • 1/2 teaspoon of cardamom
  • 30g of margarine
  • 200g of white chocolate


Preparation:

Bottom:
  1. Take a bowl, sieve flour and potato starch inside. Add sugar and margarine (cut into cubes). Knead or mix well. Add egg and knead again till well combined.
  2. Make a bowl, cover with cling film and put in the fridge for an hour.
  3. During that time, prepare the kitchen surface, to roll out the dough.
  4. Start preheating the oven to 160C.
  5. Take the cake out and roll out. 
  6. Put in the baking pan, on the entire bottom + 1cm sides.
  7. Using a fork, make holes on the entire bottom.
  8. Put in previously preheated oven and bake for 35 minutes till gold.
  9. Cool down.
Frosting:
  1. Take a pan, put cream inside, add coffee and cardamom and heat, till it all dissolves. Stop heating, add butter and chocolate, stir till it all melts (if it is hard - heat it up a little bit).
  2. Pour it on previously cooled down shortcake bottom and put in a cold place for an hour so that it stiffens.
  3. Put pieces of cherries in any pattern desired, decorate.
  4. Melt remaining milk chocolate and distribute all over the shortcake.
  5. Store in room temperature.
  6. Bon Appetit! :)

Sour-Sweet Shortcake

There are sometimes recipe on the Internet, which - when you see them - you know - they are going to be just awesome :) And this is a perfect example of such situation. This is a perfect combination of sour orange jam and sweet white chocolate with some more ingredients that will make you forget about calories ;) 
I do recommend! 
The recipe, slightly changed, comes from my favourite website.


Ingredients (for a 20x30cm baking pan):

Bottom:
  • 170g of flour
  • 80g of potato starch
  • 50g of sugar
  • 150g of cold margarine
  • 1 egg
Top:
  • A jar of orange jam
  • a handful of dried apricots
  • 100g of almond flakes
  • optionally - 4 tablespoons of orange liqueur
Chocolate frosting:
  • 150g of white chocolate
  • 5 tablespoons of 36% cream


Preparation:

Bottom:
  1. Take a bowl, sieve flour and potato starch inside. Add sugar and margarine (cut into cubes). Knead or mix well. Add egg and knead again till well combined.
  2. Make a bowl, cover with cling film and put in the fridge for an hour.
  3. During that time, prepare the kitchen surface, to roll out the dough.
  4. Start preheating the oven to 160C.
  5. Take the cake out and roll out. 
  6. Put in the baking pan, on the entire bottom + 1cm sides.
  7. Using a fork, make holes on the entire bottom.
  8. Put in previously preheated oven and bake for 35 minutes till gold.
  9. Cool down.
Top:
  1. Distribute the orange jam (mixed with 2 tablepoons of liqueur if used) all over the bottom (probably not entire jar, but half or so).
  2. Put apricots, in any pattern desired (I did the chequered pattern).
Prepare the frosting:
  1. In a pan, melt 100g of chocolate with 5 tablespoons of 36% cream (and 2 tablespoons of liqueur if used). When done, add the remaining chocolate and stir till it melts. Put aside to let it cool down a little.
  2. Distribute the frosting on a cake (any pattern desired, again) and sprinkle with almond flakes.
  3. Bon Appetit!

Wednesday, 2 July 2014

Strawberry Yoghurt Cake

I was looking for a nice strawberry cake recipe. But not the strawberry cake I’ve already made, ahh, I craved for something new, as I’m addicted to trying new recipes. And I found this strawberry yoghurt cake. One word: Wow! That’s the quickest and the one of the cheapest cake I’ve ever made! And I needed to bake 2 pans, one after another, day after day, cause it disappeared so quickly! I’m utterly shocked! And how many variations this one particular cake has, that’s unbelievable! Delicate, spongy, sweet, perfect for a morning coffee and for a nice lunch at work ;-) What’s more, that’s one of the ‘light’ cakes, so we can feel excused for eating half of the baking pan ;) (giggle) 
I do recommend!
The only thing that I found particularly difficult to explain to You is a polish dessert - powdered, quick, jelly-like, fruit-flavoured 'kisiel'. I can't find an equivalent for it in English. I do encourage You to look up for it. Wikipedia defines it as 'kissel' and explains a little bit what it is. If You are unable to buy it, You can easily use jam ;)
I made quite a lot of changes, though still - big thanks for KwestiaSmaku for the recipe!

Ingredients:

1 glass = 250ml
  • 2 big eggs
  • 1 glass of greek yoghurt
  • 2 glasses of flour
  • 2 teaspoons of baking powder
  • 500g of strawberries
  • ¾ -1 glass of sugar
  • 2 tablespoons of vanilla sugar
  • 25g of melted butter (or 25g of oil)
  • 1 powdered strawberry kissel
  • 2-3 tablespoons of strawberry jam


Optional ingredients:
  • Powdered sugar
  • X g of any other berries ;) (I had one bowl of currants from my garden, so I used them J)
  • Icing sugar


Preparation:
  1. Bring eggs and yoghurt to room temperature.
  2. Prepare 3 bowls. Mix flour with baking powder very precisely and sieve to the 1st bowl. Put aside.
  3. Wash your fruit. Take 500g of strawberries, cut out the leaves, divide into halves (250g each), put in remaining 2 bowls. Cut the strawberries into halves (if the strawberry is really big – 3 pieces)
  4. Take a mixer’s bowl. Put sugar and vanilla sugar inside.
  5. Melt the butter in a small pot.
  6. Take a rectangular baking pan (preferably 20x30 cm, might be a little bit bigger), grease it precisely with soft butter. Put aside.
  7. Start preheating the oven to 165C.
  8. Prepare the kissel as the recipe on the packaging says. Mix with jam. Mix 1/3 of this kissel-jam mixture with one strawberry bowl. Put aside.
  9. Add eggs to the mixer’s bowl with sugars.
  10. Using a mixer, start beating for 7 minutes. After that time, put the mixer aside, add yoghurt, melted butter, sieved flour with baking powder and slowly, precisely, for a short time, stir, using a big spoon or spatula, only till all the ingredients link, not longer.
  11. Put the dough in previously prepared greased baking pan, distribute the dough all over the pan.
  12. Take a bowl with kissel strawberries. Here – preferably – don’t use much of the kissel as it may destroy the cake, it is perfectly enough if there is some kissel on the strawberry. Put the strawberries all over the cake, leaving some space between them (chequered pattern works and looks perfectly).
  13. When done, put it in the oven and bake for 20 minutes. Observe your cake, it might take less or more time for Your cake to be ready, as every oven works differently – You are probably the person who knows it best.
  14. After those 20 minutes, if the top is gold, use a toothpick to check, if it is ready inside. If not – cover the top with foil and bake for another 10 minutes or so.*
  15. Cool down, take out from the pan. Take the second bowl with strawberries and kissel, fill the holes in the cake - firstly with some kissel, then with a strawberry.
  16. Sprinkle the cake with (for instance) remaining fruit (or any other additional fruit if You have prepared them), powdered sugar, icing sugar or add remaining kissel all over the cake.
  17. Bon Appetit! ;)


*the cake should be much bigger, its sides should stick out from the pan, the top should be gold and a toothpick clean (if there is any cake glued to a toothpick, it is not ready yet)


Monday, 1 July 2013

Gourmet Sensation

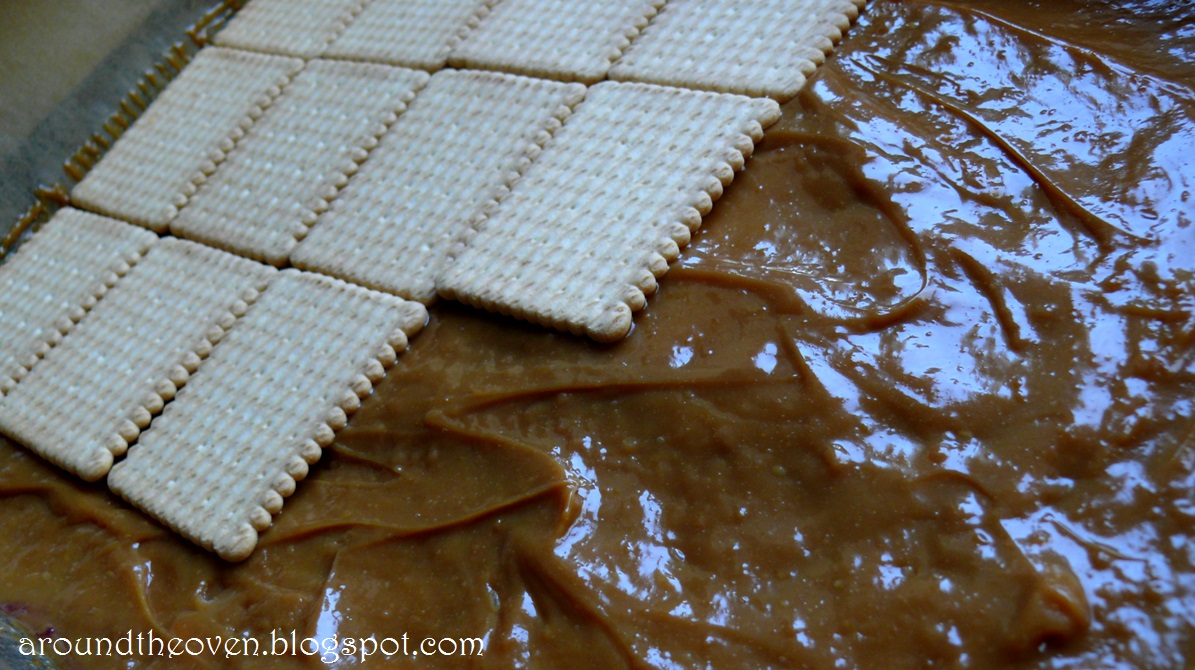
 As the title says.. and without baking :) This is absolutely one of the most delicious cakes I have ever eaten. And, this is an absolute must-do at least once in life :) What is interesting, this cake is so easy, that I could present the entire recipe (and to some extent I will) only by using pictures.


Ingredients:
  • 4 packs of biscuits (butter ones)
  • 2 vanilla 'custards' (a Polish kind of custard, you can find it on the Internet, it is called ' budyn'. If you can't find in your shops anything of that kind, here is a recipe for home-made 'budyn', you'll probably need to double the ingredients to make it suitable for that cake)
  • 2 jars of cherry jam
  • 2 tins of fudge
  • cream 36%: 2 options:
*if powdered:
2 sachets to be prepared with milk (the preparation is written on the sachet, it will be something around 200 ml of milk per sachet)
* if real one, to whip it up: 1 packaging  + 2 tablespoons of powdered sugar + here I do recommend using some kind of powder that can stiffen the cream (in Poland: śmietan-fix, made mainly of glucose and starch)


Preparation:

Briefly, tiers:
  1. biscuits
  2. pudding
  3. biscuits
  4. jam
  5. biscuits
  6. fudge
  7. biscuits
  8. cream
Description:

* every tier will be put on the entire baking sheet surface
  1. Take your baking sheet, grease it and put the baking paper inside (leave some baking paper sticking out of the baking sheet - it will help you getting the cake out of the baking sheet unless you have a sides that you tak take out, then don't)
  2. Put one tier of biscuits on the bottom of your baking sheet (rectangled preffered)

  3. Prepare the custard and pour it on the biscuits  (don't wait till it cools down)


  4. Take a pot, open the tins with fudge, put them in the pot, pour some water to the pot, so that the water covers 3/4 of the tins. Boil on a low heat (keep looking at it, but nothing bad should happen)
  5. Put another tier of biscuits - no need to wait till the pudding is cold
  6. Put the jam on the biscuits


  7. Stir slowly the fudge, check if it is not burning anyhow (it shouldn't)
  8. Put another tier of biscuits
  9. If the water with tins already boils, stir and turn it off. Using a tea towel, take the tin and a spoon, and pour the fudge on the biscuits. Take another tin and do the same.

  10. Put another tier of biscuits.
  11. Prepare whipped cream.


  12. Put the cake in the fridge (for few hours, even entire night)
  13. Keep in the fridge.
  14. Bon Appetit! :)

Monday, 24 June 2013

Sweet Omelette

Delicate, like a sponge cake, magic mix of whites and yolk. If your parens have ever told you that you can't mix whisked, stiffed egg whites with yolks because it will be a complete disaster - prove that they were/are wrong ;) 
Thanks for Kwestia Smaku for this recipe -
The original recipe isn't for a sweet omelette. So I changed it a little.

Ingredients: (1 omelette)

  • 2 eggs
  • a pinch of salt
  • 3 teaspoons of sugar
  • 2 tablespoons of flour
  • a little bit of butter 

On the top:

  • powdered sugar
  • golden syrup
  • honey
  • jam/marmalade
  • fruit
  • cinnamon
  • cocoa

* If you have a really big frying pan, you can use 3 eggs and 3 tablespoons of flour.

Preparation:

  1. Melt some butter on your frying pan. (butter must cover the entire frying pan, also sides)
  2. Seperate whites and yolks. 
  3. Stir the yolks.
  4. Put the whites in a bigger bowl (food processor's bowl) add salt and start beating the egg whites(high speed of the mixer). After a few seconds add sugar. Keep beating, until the whites are stiff.
  5. Reduce the speed of the mixer to average, without stopping the mixer add yolks (around 1/2 of a minute)
  6. Reduce the speed of the mixer to the lowest and add flour. Mix only for a few (10) seconds, till it links.
  7. Turn on the heat and put the omelette on the frying pan on a middle/low heat.
  8. Look at it carefully - it is different than a pancake, it is harder to look if the bottom is ready or not. Frying every side will take around 3-4 minutes.
  9. How to turn the side? You can either use one big spatula or two smaller  (not recommended, because it is a very delicate kind of cake) or you can take another greased frying pan (bigger preferably) and try to put them together and turn over. You can also take it out from the frying pan, put it on the plate, cover the plate with the frying pan and then flip so that the omelette is on the frying pan again.
  10. Put it on a plate and add 'toppings' :)
  11. Bon appetit! :)

* Well-prepared omelette should be stiff after frying and should neither crincle nor get softer.